#natural-anchors #rigging #rigging-concepts
# Evaluating Boulders as Anchors
# Introduction
Boulder wraps are a very common form of highline anchor, but require more knowledge than bolt or tree anchors. Unlike trad anchors that require specialized gear, boulder wraps can be done with just spansets or rope. This makes them an accessible anchor to build with respect to the gear needed, but it is very hard to learn how to tell if a given boulder is safe to rig to. It takes dedicated mentorship that can be difficult to find, especially in areas where boulder anchors aren’t very common. The few discussions about the topic on SlackChat have at least as much bragging about what people have gotten away with as there is good information.
The goal of this post is to cover the details of evaluating a boulder for highline rigging. I will focus on some simple physics and how to estimate a ballpark strength. The goal is not to be able to definitively say how strong a given anchor is, but rather to be able to better compare different anchors, and potentially rule out unsafe anchors. This article will not cover how to rig off of boulders. It will only help give a framework for deciding whether a given boulder is safe to rig off of.
# Accidents
There have been a handful of high profile accidents that happened while rigging off of boulders. It is important to know about these, as they show the risk of boulder rigging and reveal common pitfalls. This fatality in Brazil and the much more recent close call in Mexico are both well chronicled by the International Slackline Association (ISA). Both accidents involved anchoring to some type of bolt, the underlying issue in each case was the size of the block that was rigged to. There was also a near miss anchor failure that happened last year involving a slung boulder, that is worth discussing in detail.

A few days into the Red Rocks Reacharound gathering in 2024, Michael was walking the 180m Blue line and had just crossed the halfway point when he fell for the third time that session. As he bounced in the leash, he heard a loud sound and felt himself drop. Looking up at the far anchor, he saw a cloud of dust. What he felt, heard, and saw were the effects of the boulder the line was anchored to falling off its resting place.
The boulder was roughly 1m x 2m x 4m (8m^3) in size, and had slid about a meter forward and a meter and a half down to lay tilting forward. It also had a few horns extending behind an adjacent larger rock that looked like they would help keep the boulder from moving, but were broken during the fall.
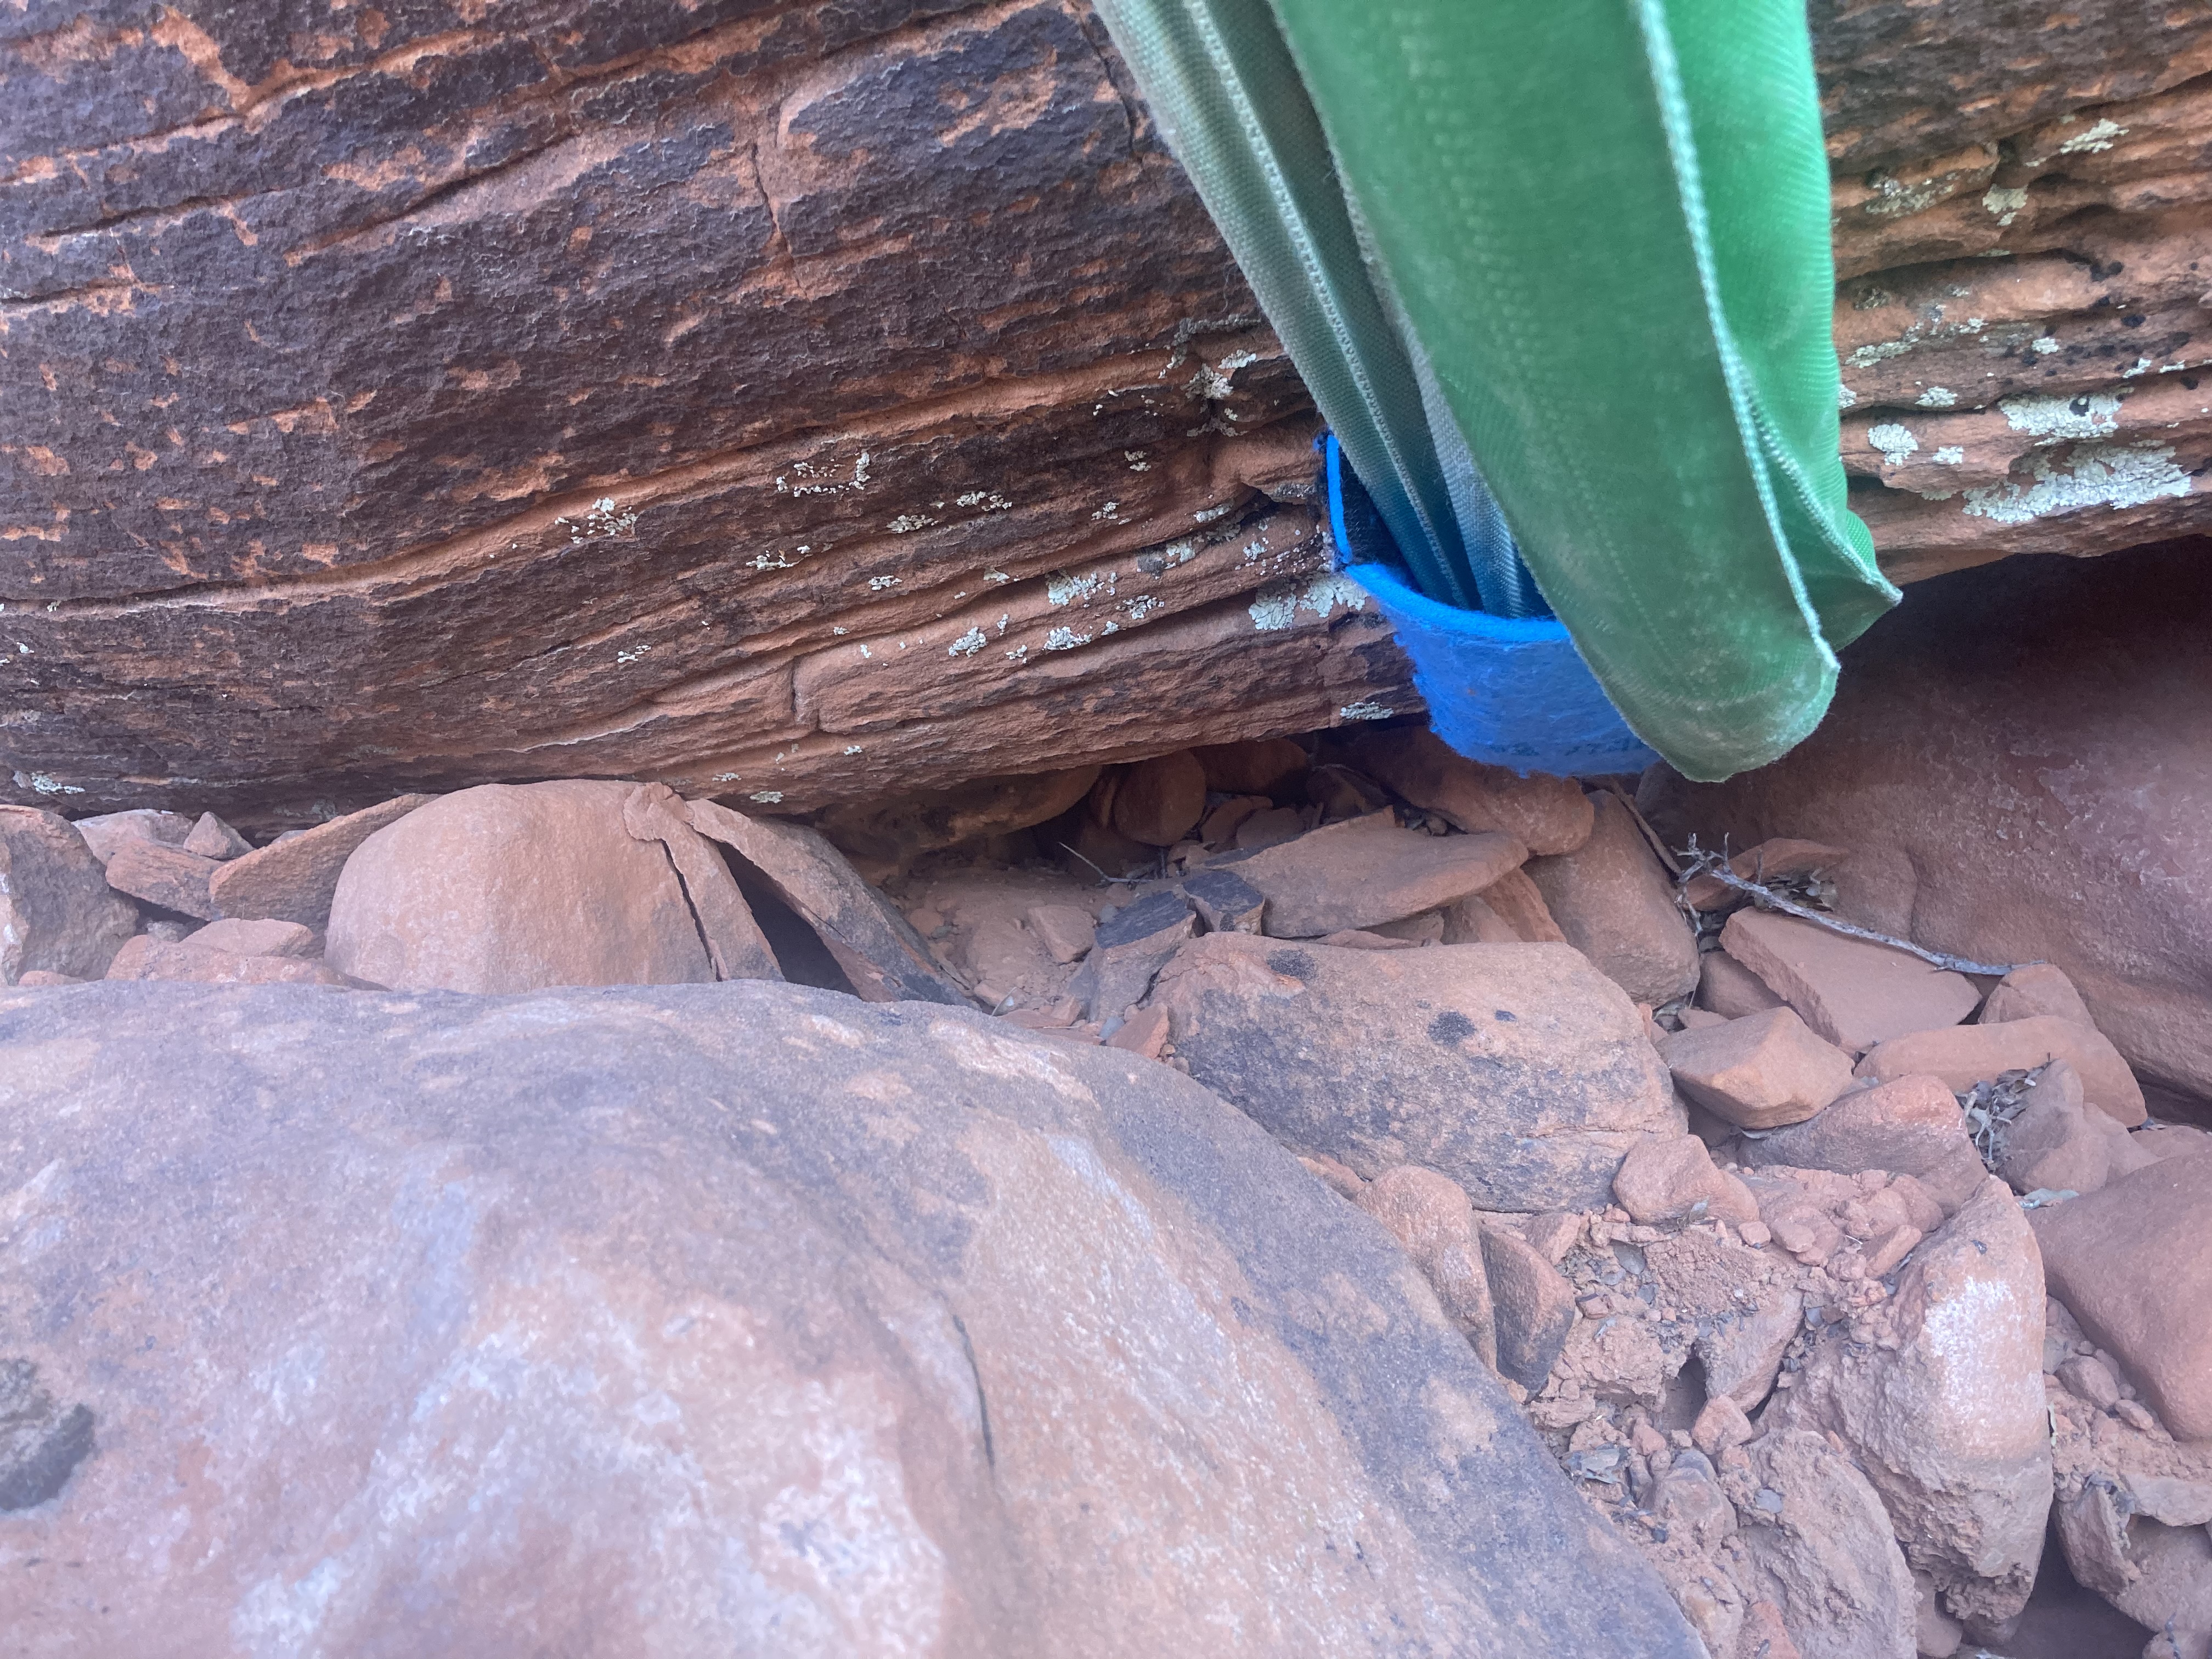
Looking at it after the fact, it was clear the boulder had very little surface contact with the ground it was resting on, and the surface was sandy, fractured sandstone. This means there was very little friction to keep the boulder from moving. Also, the sandstone in the area was very weak, which led the horns that were seemingly keeping the boulder in place to break off. Luckily the boulder came to rest against another block in front of it, which helped prevent it from continuing to slide. Also, the new contact point between the boulder and the rock below was only about 1 foot away from crushing both spansets, which would likely have caused them to be cut and for the entire anchor to fail. During the actual fall there was 1 hole put in the sheath of a green spanset that did not reveal the core, and the other green spanset was unharmed. It appears very lucky that the rock shifted in such a way that the spansets were unharmed. It was also very lucky the rock didn’t fall far enough for it to break into multiple pieces, which also would have compromised the anchor.
The boulder, while quite large in 2 dimensions, was relatively thin, making it easy to overestimate its size. It was right on the edge of being the size of a small car, and may have been big enough in a different setting. What was obviously unacceptable was the contact point of the rock. The boulder had very little contact with the weak underlying rock, and the center of mass of the rock was probably very close to being off the base of support. This made it very likely that the anchor would fail over time. It’s possible there were a series of small, unnoticeable shifts in the anchor before it finally failed.
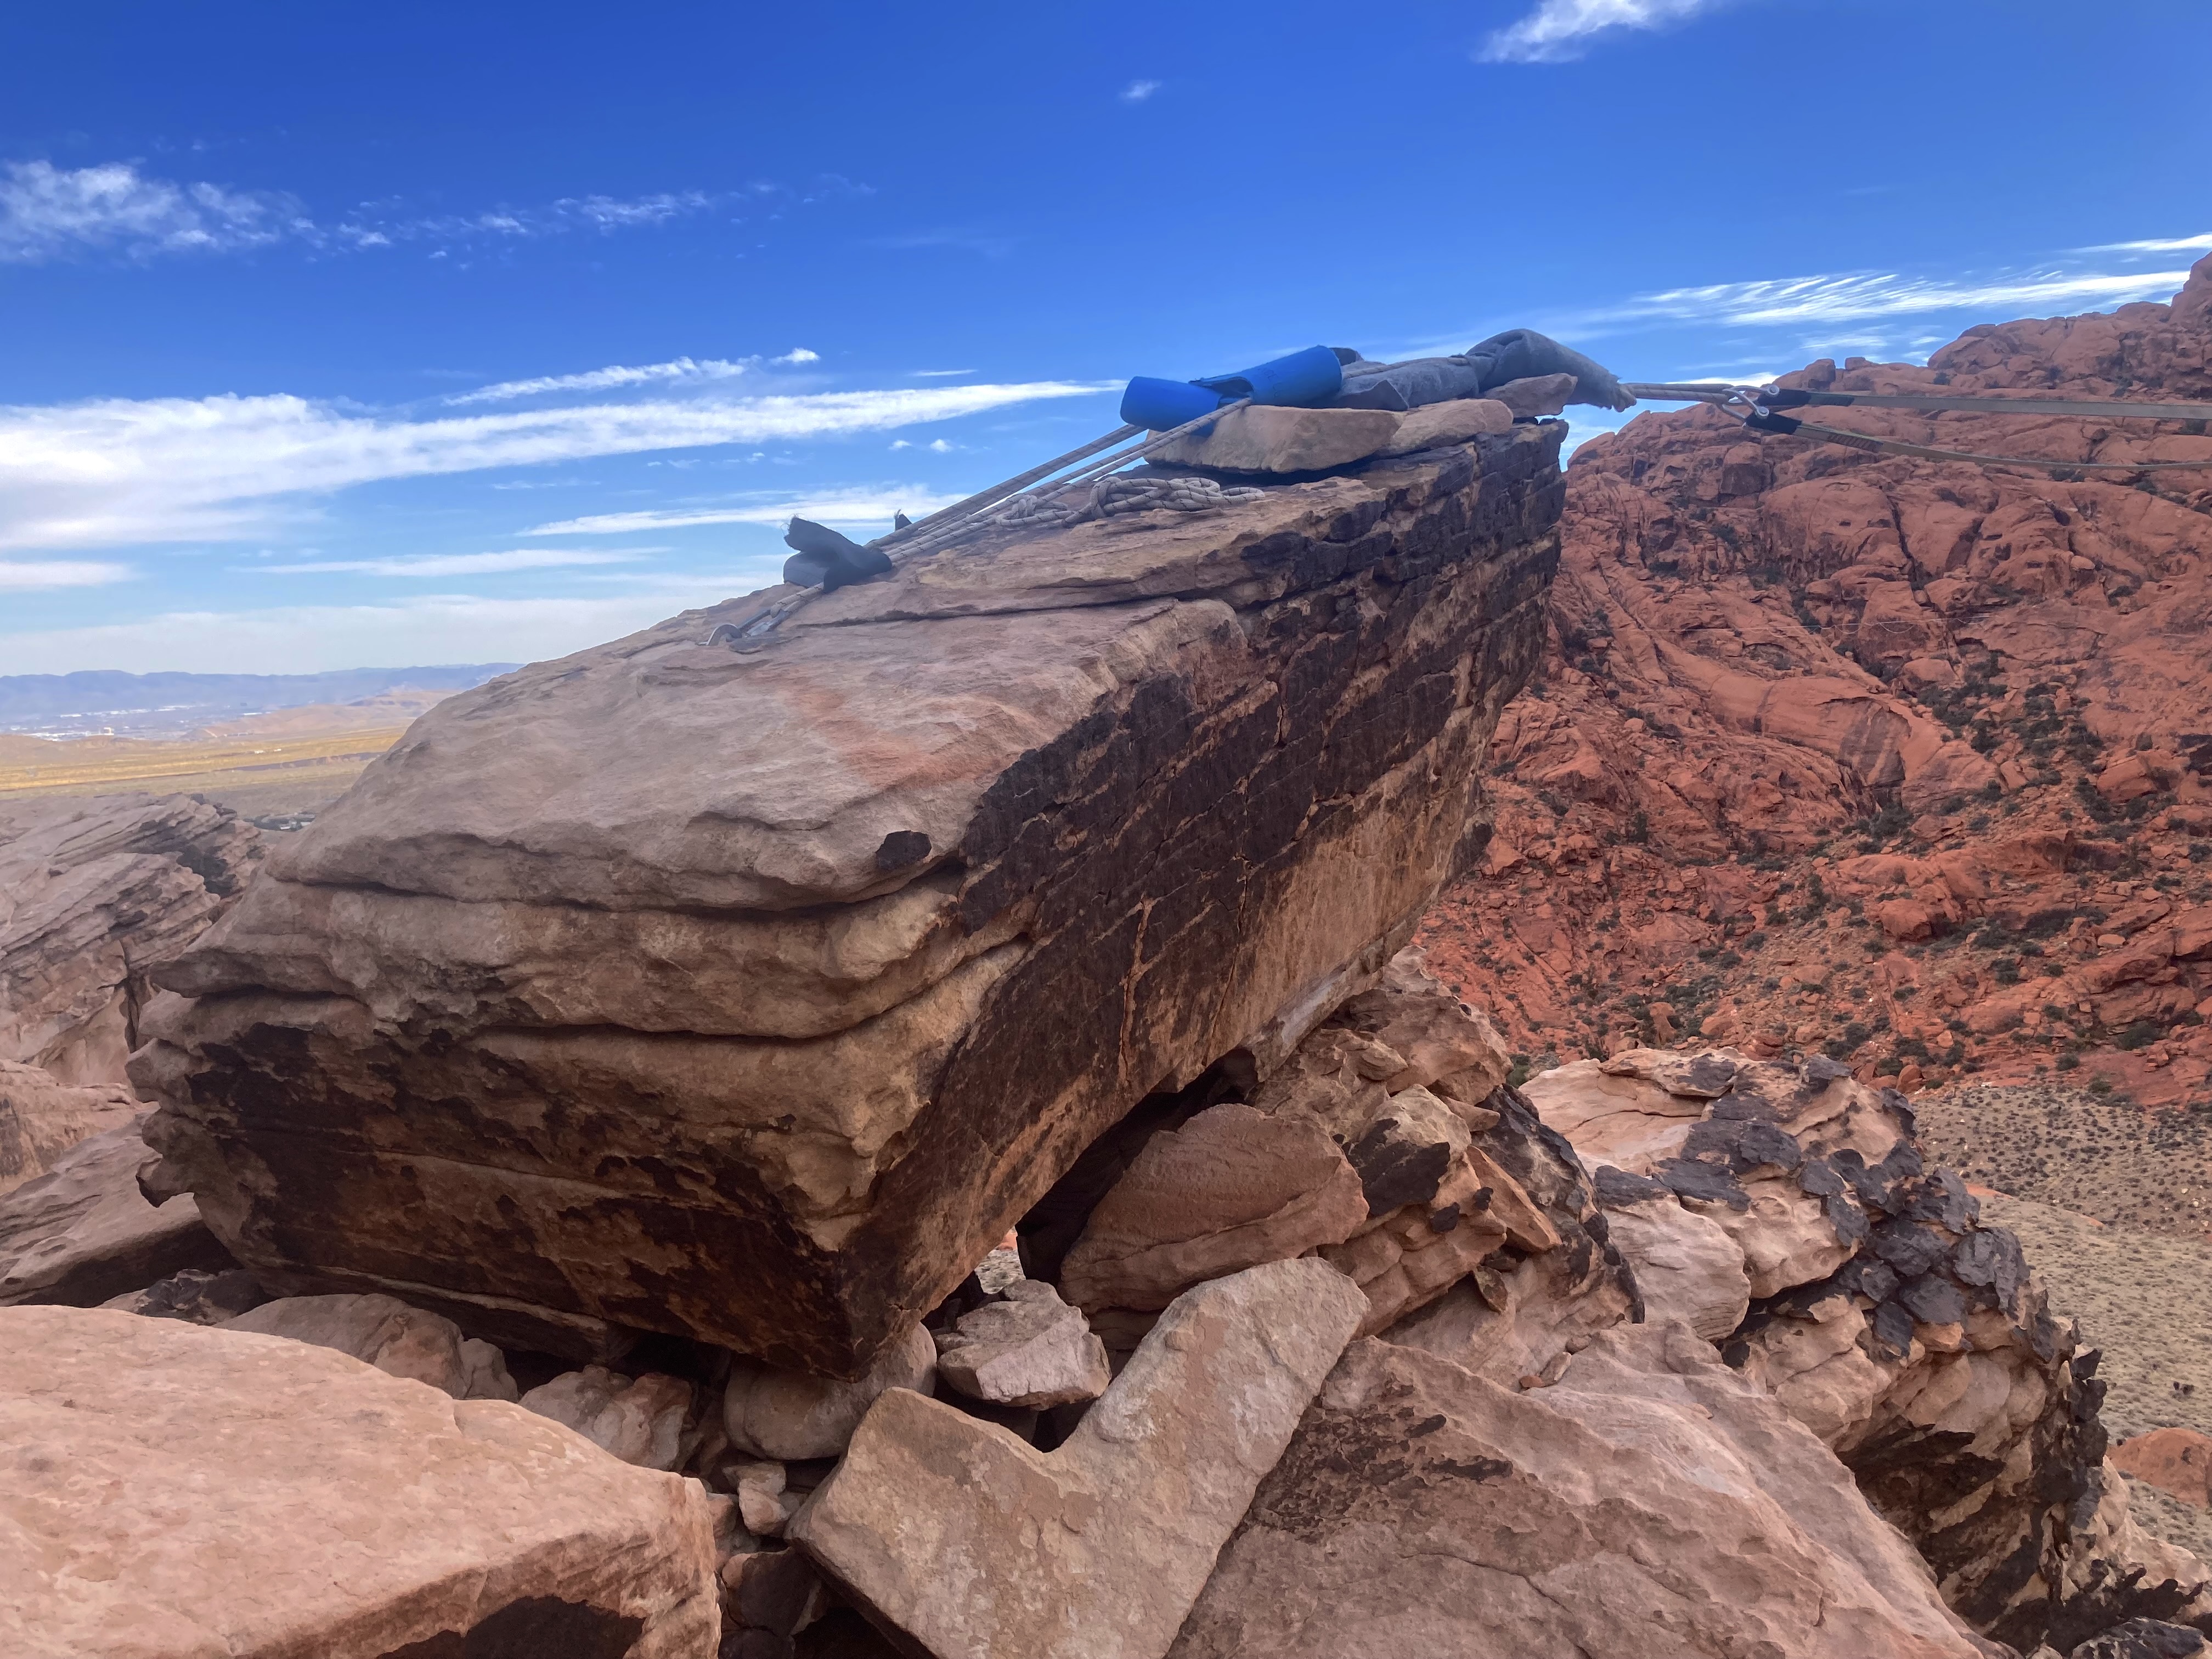
Aside from the near accident that occurred, there was also a very concerning boulder on the far side of a 70m line. Apparently this boulder had been slung in the past and participants had brought up safety concerns about its size. As a resolution, someone bolted the boulder itself thinking it was an improvement. Instead, what they did was replicate the failure mode of the Brazil fatality linked above. This line was barely used during the festival because word spread that the far anchor wasn’t safe, and it was derigged after the 180m anchor boulder moved. The boulder itself is roughly half the size of the boulder that moved on the 180m, and has a similarly small contact patch. In the picture you can see a gap under the boulder that you can see all the way to the valley floor through. While the boulder is being pulled very slightly uphill, the center of mass appears to be above the edge of the cliff, and the bolts have the potential to cause a tipping or flipping motion. Unlike the boulder anchor for the 180m that had a very gentle slope in front of it with other boulders, this anchor has a sheer drop, and the boulder moving would be catastrophic for the line.
These accidents and near misses demonstrate the risks of rigging to boulders, and the importance of evaluating your boulders well. Keep these lessons in mind while reading the rest of this post, and while rigging with boulders on your own.
# Practical Evaluation
When we’re natural rigging, we never get an opportunity to know with certainty the strength of what we’re rigging to. We don’t have the opportunity to weigh the boulder we’re using, measure the coefficient of friction between rocks, or find out how deep a tree’s roots go into the soil. The trick is to do our best to estimate the relevant factors with what limited information we have. The purpose of this section is to develop heuristics to help you estimate the unknowns, and develop a sense of the magnitude of our uncertainty. We will cover in precise formulas with imprecise inputs. As always in highlining, give yourself a large safety factor to mitigate risk.
As a general rule of thumb, you shouldn’t rig to a boulder smaller than the size of a small car, which is roughly 1.5x1.5x4 m, or 9 m^3. There have been a number of cases of refrigerator sized (roughly 1x1x2 m, or 2 m^3) boulders being pulled off a cliff by a highline. The size of a small car is a good minimum for most cases, but going into depth we’ll see there are cases where it’s insufficient, as well as cases where it’s possible to get away with less. Beyond size, always take into account some estimate of density, friction, and slope to get a more complete picture.
# Estimating Size
Size is the easiest part of the equation to estimate with boulders. You figure out the best way to split it into three planes and estimate its length, width, and height. Multiply those together and you have the volume of the boulder, which can help you compare to other boulders you’ve rigged to in the past. As long as most of the boulder is visible, it’s easy to do this without any tools. Find out roughly how big 1, 1.5, and 2 meters are on your body, and combine those measurements to estimate in the real world (waist high might mean 1m, two full arm spans might mean 3.5m). The issue is that most boulders aren’t perfect rectangles, so calculating the actual volume can be tough. What do you do if part of the form is missing or protruding? It’s best to be as conservative as possible, so choose the smaller edge when you have an option. Miscalculating a side can lead to very different results. For example, if you estimate a boulder to be 2x2x2m (8m^3) but it’s actually 1.5x1.5x2m (4.5m^3), it’s just above half the size of your estimate. Small errors get compounded while multiplying the edge lengths. Like the old saying to measure twice and cut once, look at the whole boulder and use the small perpendicular edges while calculating volume.
# Estimating Density
Knowing the size of your boulder is important, but not all rocks are the same density. The blocks at Stonehenge might support a slackline, but the full scale replica at Foamhenge wouldn’t. If you check a geology textbook, you’ll find most rocks we rig off of have a density of around 2600 kg/m^3. A quick calculation makes this look very encouraging. A 2m^3 boulder, roughly the size of a refrigerator, would have a mass of around 5200 kg. Multiply that by the force of gravity (9.8m/s^2) and you get ~51kN of weight. It’s then tempting to say it would take more than 50 kN to move the boulder, so it’s fine to rig off of. But as mentioned above, refrigerator sized blocks have failed as highline anchors multiple times, so the picture must be more complicated than it seems.
Estimated Wet Bulk Density and Porosity by Rock Type:
| Rock Type | Low Density Estimate | High Density Estimate | Porosity Range |
|---|---|---|---|
| Granite | 2500 kg/m^3 | 2800 kg/m^3 | 0.01 - 25% |
| Limestone | 2500 kg/m^3 | 2750 kg/m^3 | 1 - 25% |
| Sandstone | 2200 kg/m^3 | 2600 kg/m^3 | 5 - 30% |
Table values and explanation of density and porosity from [Hydrogeologic Properties of Earth Materials and Principles of Groundwater Flow - The Groundwater Project](https://books.gw-project.org/hydrogeologic-properties-of-earth-materials-and-principles-of-groundwater-flow/chapter/total-porosity/). The porosity range for granite combines both "fresh" and "weathered" granite, which are separated in the source. The upstream source of this data is ThoughtCo, who does not cite their source - let me know if you find a more reliable source.
The density estimates typically found online, and listed in the table above, are given as wet bulk density. This is the weight of the rock fully saturated with water divided by its volume. Obviously we’re not rigging off of fully saturated boulders, so what we’re interested in is the dry bulk density, which is the density when the rock is filled with air. To find the dry bulk density from the wet bulk density, you need to multiply it by one minus the porosity, which is the percent of the volume of rock that is just air. The biggest thing to notice here is that within each type of rock there’s huge variance in the porosity. A piece of granite and a piece of sandstone might have the same wet bulk density and be the same size, but the sandstone could weight 30% less. Similarly two pieces of granite might have the same wet bulk density and be the same size, but if one has been significantly more weathered it might have lost 25% of its weight over time. This means estimating off wet bulk density alone can get you up to a 30% error, but there’s more limitations on our naive force estimation from before that we will cover in the next section.
As a heuristic for estimating density, you can pick up nearby rocks and see if they feel light or heavy for their size. A surprisingly light rock indicates your boulder is probably relatively porous, whereas a heavier than expected rock indicates your boulder is probably dense. If you go with this approach, try to make sure the rocks you are comparing against are as similar as possible to the boulder you are trying to rig off of.
# Estimating Friction
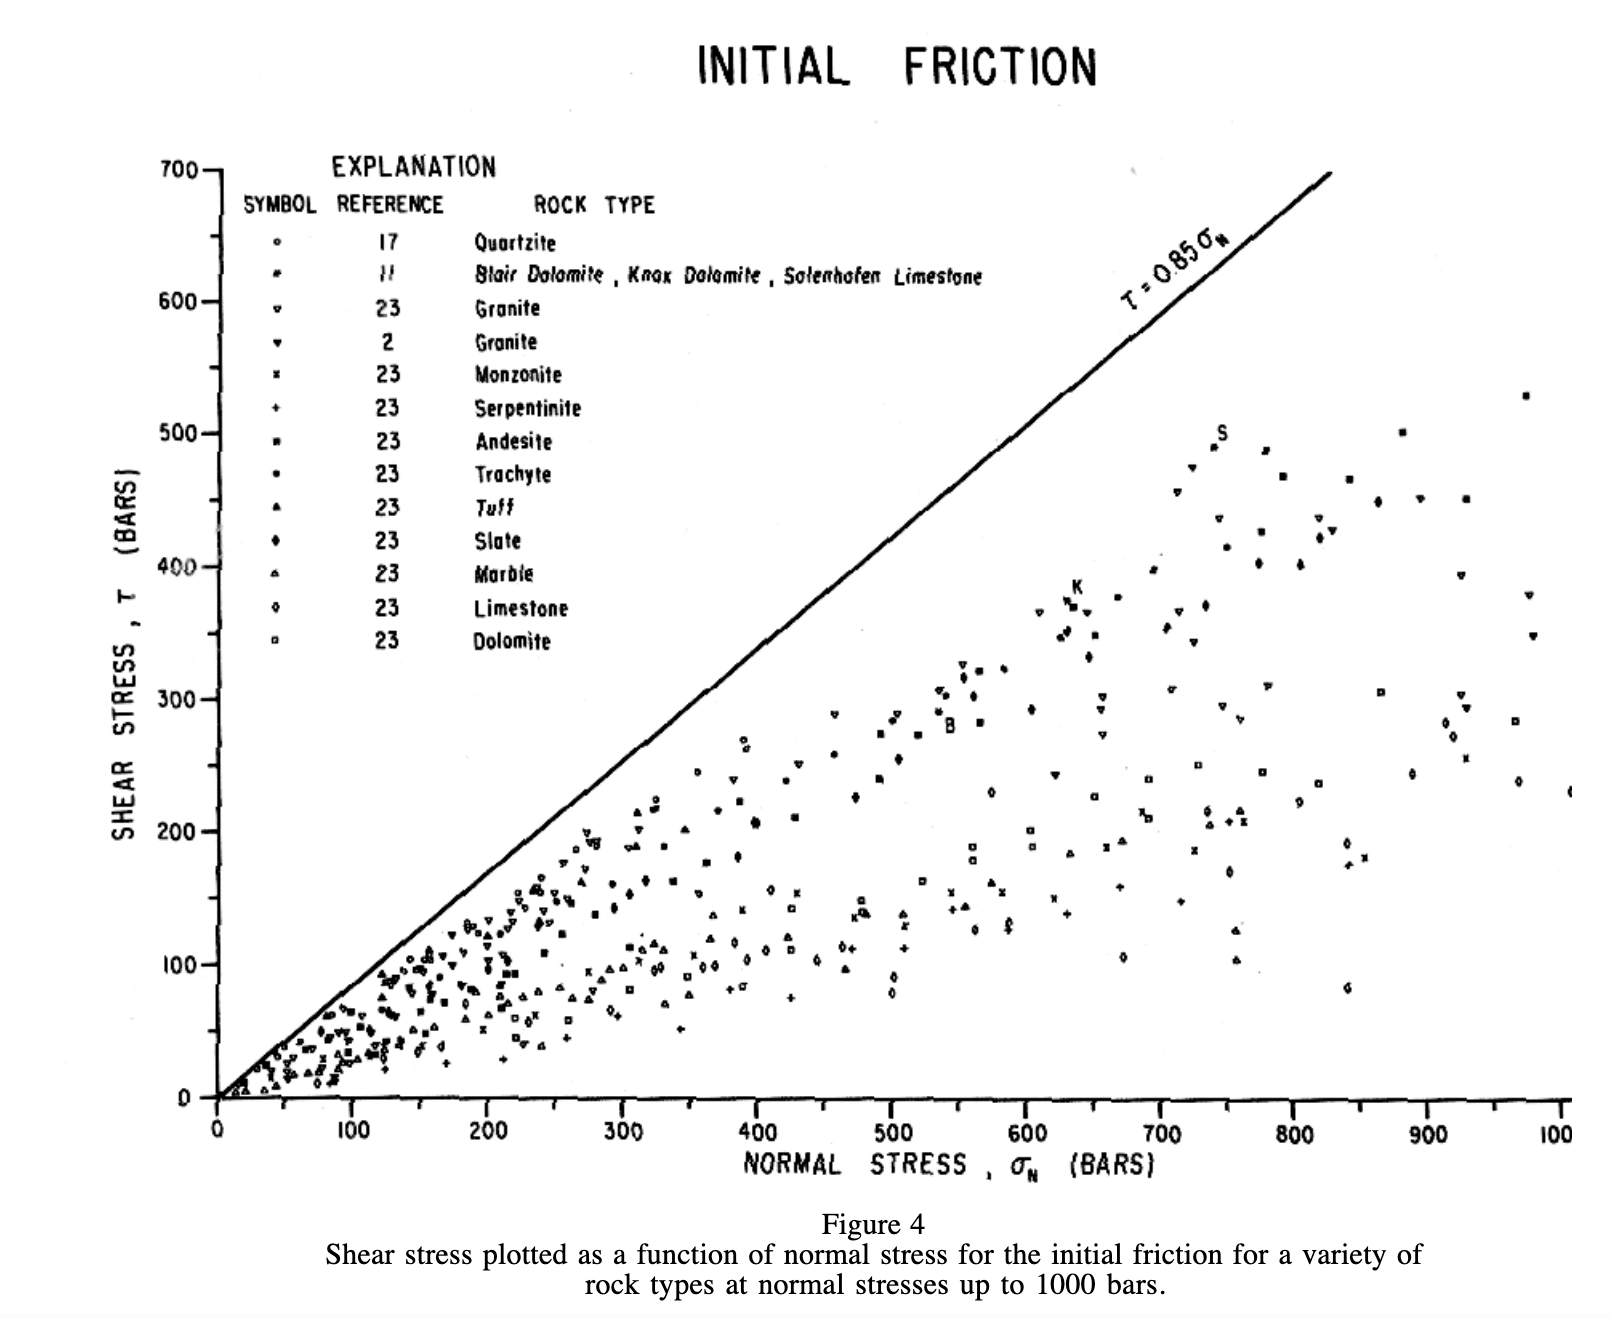
The force required to move a stationary object on a flat plane is the weight times the coefficient of friction. A coefficient of friction of greater than 1 means that it will take more force than an object’s weight to move it, and a coefficient of friction less than 1 means it will take less force than an objects weight to move it. In an ideal setting, the coefficient of friction is the same regardless of the size of the contact surface. So regardless of the size of the boulder or amount of contact it has with the ground, the weight and coefficient of friction should give us the force required to move the boulder. In a 1978 paper Friction of Rocks from the United States Geological Survey (USGS), the author gives us a range to estimate the friction between two rocks: “the coefficient of friction can be as low as 0.3 and as high as 10.” However, the high values mentioned only show up in “maximum friction” after a “stick-slip” cycle. The values we’re interested in are the “initial friction” values, which is the amount it takes to start moving. In the relevant graph, we see all the data points are below 0.85, which gives us a practical range of 0.3 - 0.85. Importantly the author says “there is no strong dependence of friction on rock type”, so this range will be constant across difference scenarios.
At the start of this section, I mentioned that in an ideal case the size of the contact surface doesn’t affect the coefficient of friction. However, in the case of friction between rocks “the large variation in friction is due to the variation of friction with surface roughness”. Surface roughness is one of the cases where the ideal model of friction breaks down. Because surface roughness is the major contributing factor, the size of contact patch matters a lot in considering how much friction a boulder has with the ground its resting on. Favor boulders with a lot of surface contact over boulders with little surface contact. A boulder with barely any surface contact could be as much as 3 times easier to move than a boulder with significant surface contact.
# Factoring in Slope
So far we’ve considered size, density, and friction, but have assumed we’re on a fully level surface. In reality, we’re often working with sloped surfaces that will complicate the math. Everyone should already have the basic intuition for this scenario though: it is harder to pull something uphill, and easier to pull it downhill. To make this more rigorous, we can consider two different components of force, one parallel to angle of the slope and one perpendicular. The force with friction we calculated in the last section is perpendicular to the slope, and some trigonometry tells us we need to multiply the force of friction by the cosine of the angle of our slope. The parallel force doesn’t have friction, so it’s just the weight times the sine of the angle of our slope. If we treat downhill slopes as positive angles and uphill slopes as negative angles, we can subtract the parallel force from the perpendicular force to get the total. Because of the shape of sine and cosine waves, this effect will be very small with small uphill and downhill angles, but will become stronger very quickly as the angles increase. In the extreme uphill case, it would require lifting the boulder entirely off the ground to get it to move. In the extreme downhill case, the boulder would already be right on the edge of sliding downhill.
# Center of Mass and Tipping Forces
In all the above we have also been assuming we are pulling the boulder right at its center of mass. However, as the accident report about the fatality in Brazil describes well, it can be extremely important where you pull on a block or boulder. If you pull high above the center of mass, you can cause it to tip. If the rock is unstable, pulling too far below the center of mass could also cause the rock to tip (like knocking someone over by pushing on their knees). Generally though, it’s better to err on the side rigging lower on a boulder and just avoiding boulders that are unstable. You want to find boulders with a wide base of support (more like a pyramid than an upside down pyramid) and pull at the center of mass or below. I have not done any mathematical modeling of this, it is just a demonstrated problem from reported accidents.
# Full Calculation
If we put all of the above together, we get the following equation for the force required to move the boulder:
Force = Friction * (1 - porosity) * wet bulk density * gravity * volume * cos(slope) - (1 - porosity) * wet bulk density * gravity * volume * sin(slope)
Or to put it more simply, if weight = (1 - porosity) * wet bulk density * gravity * volume, then:
Force = Friction * weight * cos(slope) - weight * sin(slope)
To fill in reasonable assumptions for the variables:
- Friction: 0.3 - 0.85, depending on surface roughness
- Porosity: 0.01 - 30%, depending on rock type
- Wet Bulk Density: 2200 - 2800 kg/m^3, depending on rock type
- Gravity: 9.8 m/s^2
- Volume: calculate on your own in m^3
- Slope: calculate on your own
It’s important to keep in mind that this formula is limited. For one, we never have exact knowledge of all the variables, so at best we get an estimate of the force it would take to move the boulder. Also, the formula doesn’t take into account the size of the contact surface or any tipping forces. There’s also a lot that could change the behavior of the system, like the boulder being in contact with other boulders that might keep it from moving, a layer of dirt surrounding the base of the boulder, or even the boulder resting on a surface that isn’t rock. Finally, there’s other problems that could occur besides just the boulder moving. There’s been at least one case of a boulder exploding from compression while being used as a highline anchor, so general rock quality, presence of cracks and seams, and internal structure all play important roles that aren’t factored into this calculation. In light of this, always be conservative with your estimations and give yourself a large safety factor to help prevent fatal errors.
# Comparisons
The value of this equation isn’t in getting an exact number for the strength of the boulder. There’s too much uncertainty in the variables and too much missing context for it to be able to do that. What it does allow is to do is compare the effect sizes of different variables and of our uncertainties. The rest of this section will provide comparisons within the ranges of variables in order to show how changes to the variables effect the strength of a boulder.
Friction: Using constants of 0.2 for porosity, 2600 kg/m^3 for wet bulk density, 8m^3 for volume, and 0 degrees for the slope, we can change the friction coefficient to see its effects. At the lower end of the friction range (0.3) we get 48.9 kN, which is just barely sufficient for an anchor if we’ve estimated everything correctly. With the max friction value we get 138.6 kN, just under 3 times stronger and much better as a choice for an anchor.
Using 10 degrees for the slope, we get a more pronounced effect. At a friction of 0.3, we get 19.9 kN. That is far too weak for an anchor, especially factoring in any uncertainty in our other values. However, if instead set the friction to 0.85, we get 5 times our other value at 108.2 kN, which is clearly good if we have estimated our other parameters correctly. This shows us that as the slope angle increases, the effect of friction is increased. This is because friction only appears in the perpendicular force term, not the parallel force term.
Porosity: Using constants of 0.5 for friction, 2600 kg/m^3 for wet bulk density, 8m^3 for volume, and 0 degrees for the slope, we can compare the range of porosities. At the low end for granite of 0.01, we get a strength of 100.1 kN. With a porosity of 30 corresponding to a very porous sandstone, we get 71.34 kN, corresponding directly to the expected 30% strength loss. Because porosity is in both the parallel and perpendicular force terms, it will not change effect size as the slope changes. The same is true for the rest of our terms.
Wet Bulk Density: Using constants of 0.5 for friction, 0.2 for porosity, 8 m^3 for volume, and 0 degrees for the slope, we can compare our high and low values for wet bulk density. Using 2750 kg/m^3, corresponding to the upper range of limestone, as our wet bulk density gives a strength of 86.24 kN. Using the low value for sandstone instead of 2200 kg/m^3 gives 69.0 kN, showing wet bulk density is a relatively minor factor in relation to the other factors considered so far.
Volume: Using constants of 0.5 for friction, 0.2 for porosity, 2600 kg/m^3 for wet bulk density, and 0 degrees for the slope, if we assume each side of our block is 2 m, we get a volume of 8 m^3 and a strength of 81.5 kN. If each side of our block is 0.2 m longer our total volume is 10.6 m^3, and the strength is 108.5 kN. If instead we overestimated the length of each side and each side is 0.2 m shorter our total volume is 5.8 m^3 and the strength is 59.4 kN. That means a 10% uncertainty in side length leads to a factor of almost 2 in the final uncertainty. Estimating the side length is thus an extremely important part of the equation, leading to a lot of potential error is estimated incorrectly.
Slope: Using constants of 0.5 for friction, 0.2 for porosity, 2600 kg/m^3 for wet bulk density, and 8 m^3 for the volume, with a slope of 0 we get 81.5 kN. Increasing the slope to -5 degrees (5 degrees uphill) increases the force to 95.4 kN, and decreasing the slope to 5 degrees decreases the force to 67.01 kN. Choosing a more extreme slope of -15 degrees increases the force to 121.0 kN, and decreasing it to 15 degrees decreases the force to 36.55 kN. With these constants, at a slope of 26.6 degrees, the boulder would start sliding downhill on its own. This shows that slope is an extremely important factor, as slopes that might not feel extreme can have a very significant effect. For reference, a 26 degree slope would be a blue ski run at most resorts.
# Conclusion
If we return to the Red Rocks incident above, we can estimate the strength of the boulder to be 25.6 kN. This is very low for an anchor, especially given the uncertainty in our calculator, but we also know the line didn’t hit 25 kN in a whip. This shows that some factor was present in the real world that’s missing in our model. Tipping forces are likely a big part of it, but there’s also a number of factors that could have been different from the model. This shows the importance of building large safety factors into your calculations.
This calculation method isn’t fool proof, and shouldn’t be entirely relied upon. There are important variables and context missing, and the variables we do cover need to be estimated in the field. The point of this is not to say whether one specific boulder is good or not by calculating the force required to move it. The point is to inform your decision making, in particular to help you understand the factors that influence the strength of a boulder and the effect size of your uncertainty. Always be conservative with your anchor choices and add extra backups if you have any doubt.