Factors Influencing Choice of Split Connections
# Factors Influencing Choice of Split Connections
There are many ways of making split connections on highlines, with no single method clearly considered “best” by the community. This post aims to give a general rubric for evaluating the safety and suitability of split connections for your rig, and provides a framework for inspecting new methods as they are theorized. Safety related factors are given first, and receive the bulk of the discussion, followed by a short section on convenience factors. Choosing the proper split design is an important way to maximize the safety benefits of connected highlines while minimizing the risk of additional failure points.
Also included in the post are top and side views of most of the popular split setups for reference.
# Safety Related Factors
# Strength
How strong does a connector in a highline split need to be?
The first answer is as strong as any expected force, plus a safety factor. On a shorter highline, that max expected force should be about 7 kN. I have measured this with a heavier person taking a leashfall on a 50m nylon line, and while slightly longer lines rigged correctly can mitigate this force, I still believe 7 kN is a good calculation starting point for highline forces. That would give a minimum connector strength of 21 kN with a 3:1 safety factor, and of 28 kN with a 4:1 safety factor. These values are right in line with the webbing strengths of most nylon and high stretch polyester webbings commonly used on shorter highlines. Keep in mind that we’re interested in the strength of the connector in the configuration it will be used in so an aluminum carabiner, for example, rated to 21 kN, is not suitable because it will not be 21 kN once triloaded between two sewn loops.
What happens as lines get longer? The highest forces recorded on very large highlines are around 20 kN in wind (the Asbestos 1.9 km reached 20.5 kN peak force, and the Norway 2.8km reached 19.5 kN peak force), and it is clear a 21 kN connector will no longer suffice. But achieving even a 3:1 safety factor then requires a 60kN connector, which is unnecessary when most high tech webbings used in these big lines break between 30 and 35 kN in a sewn loop. This motivates the more general recommendation that your connector in a split system should be as strong as the strength of the webbing it is attached to in a sewn loop.
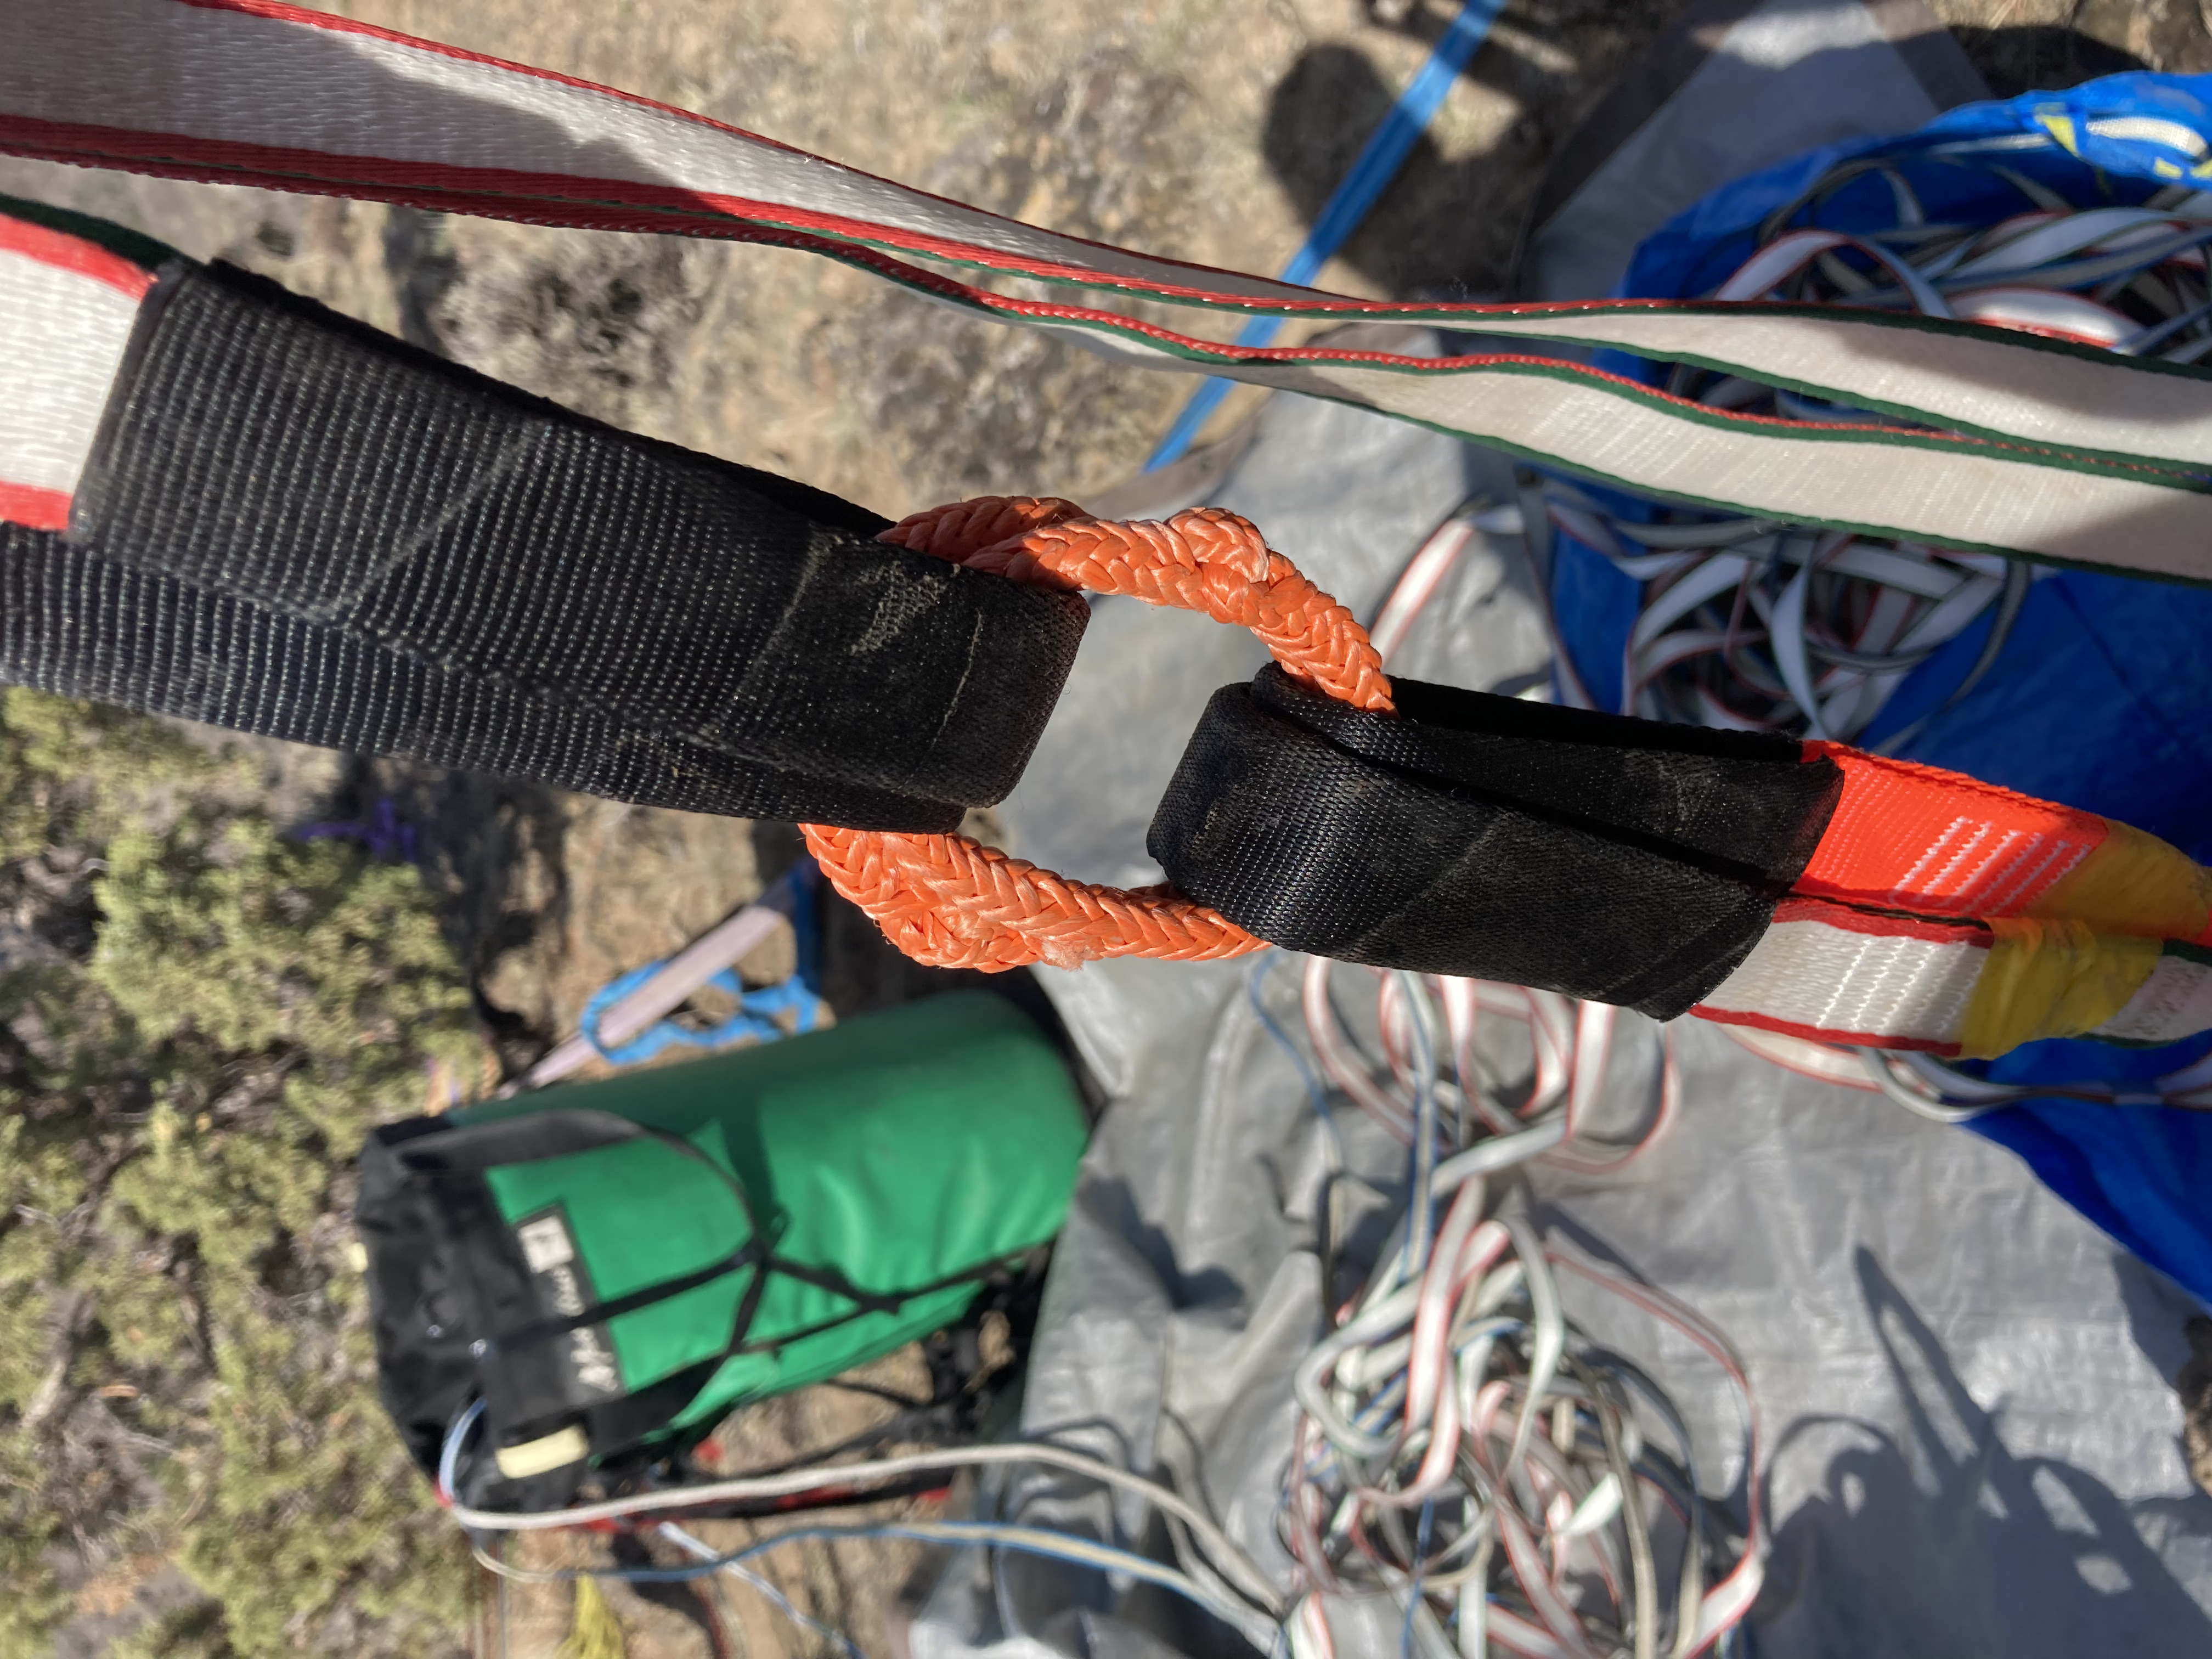
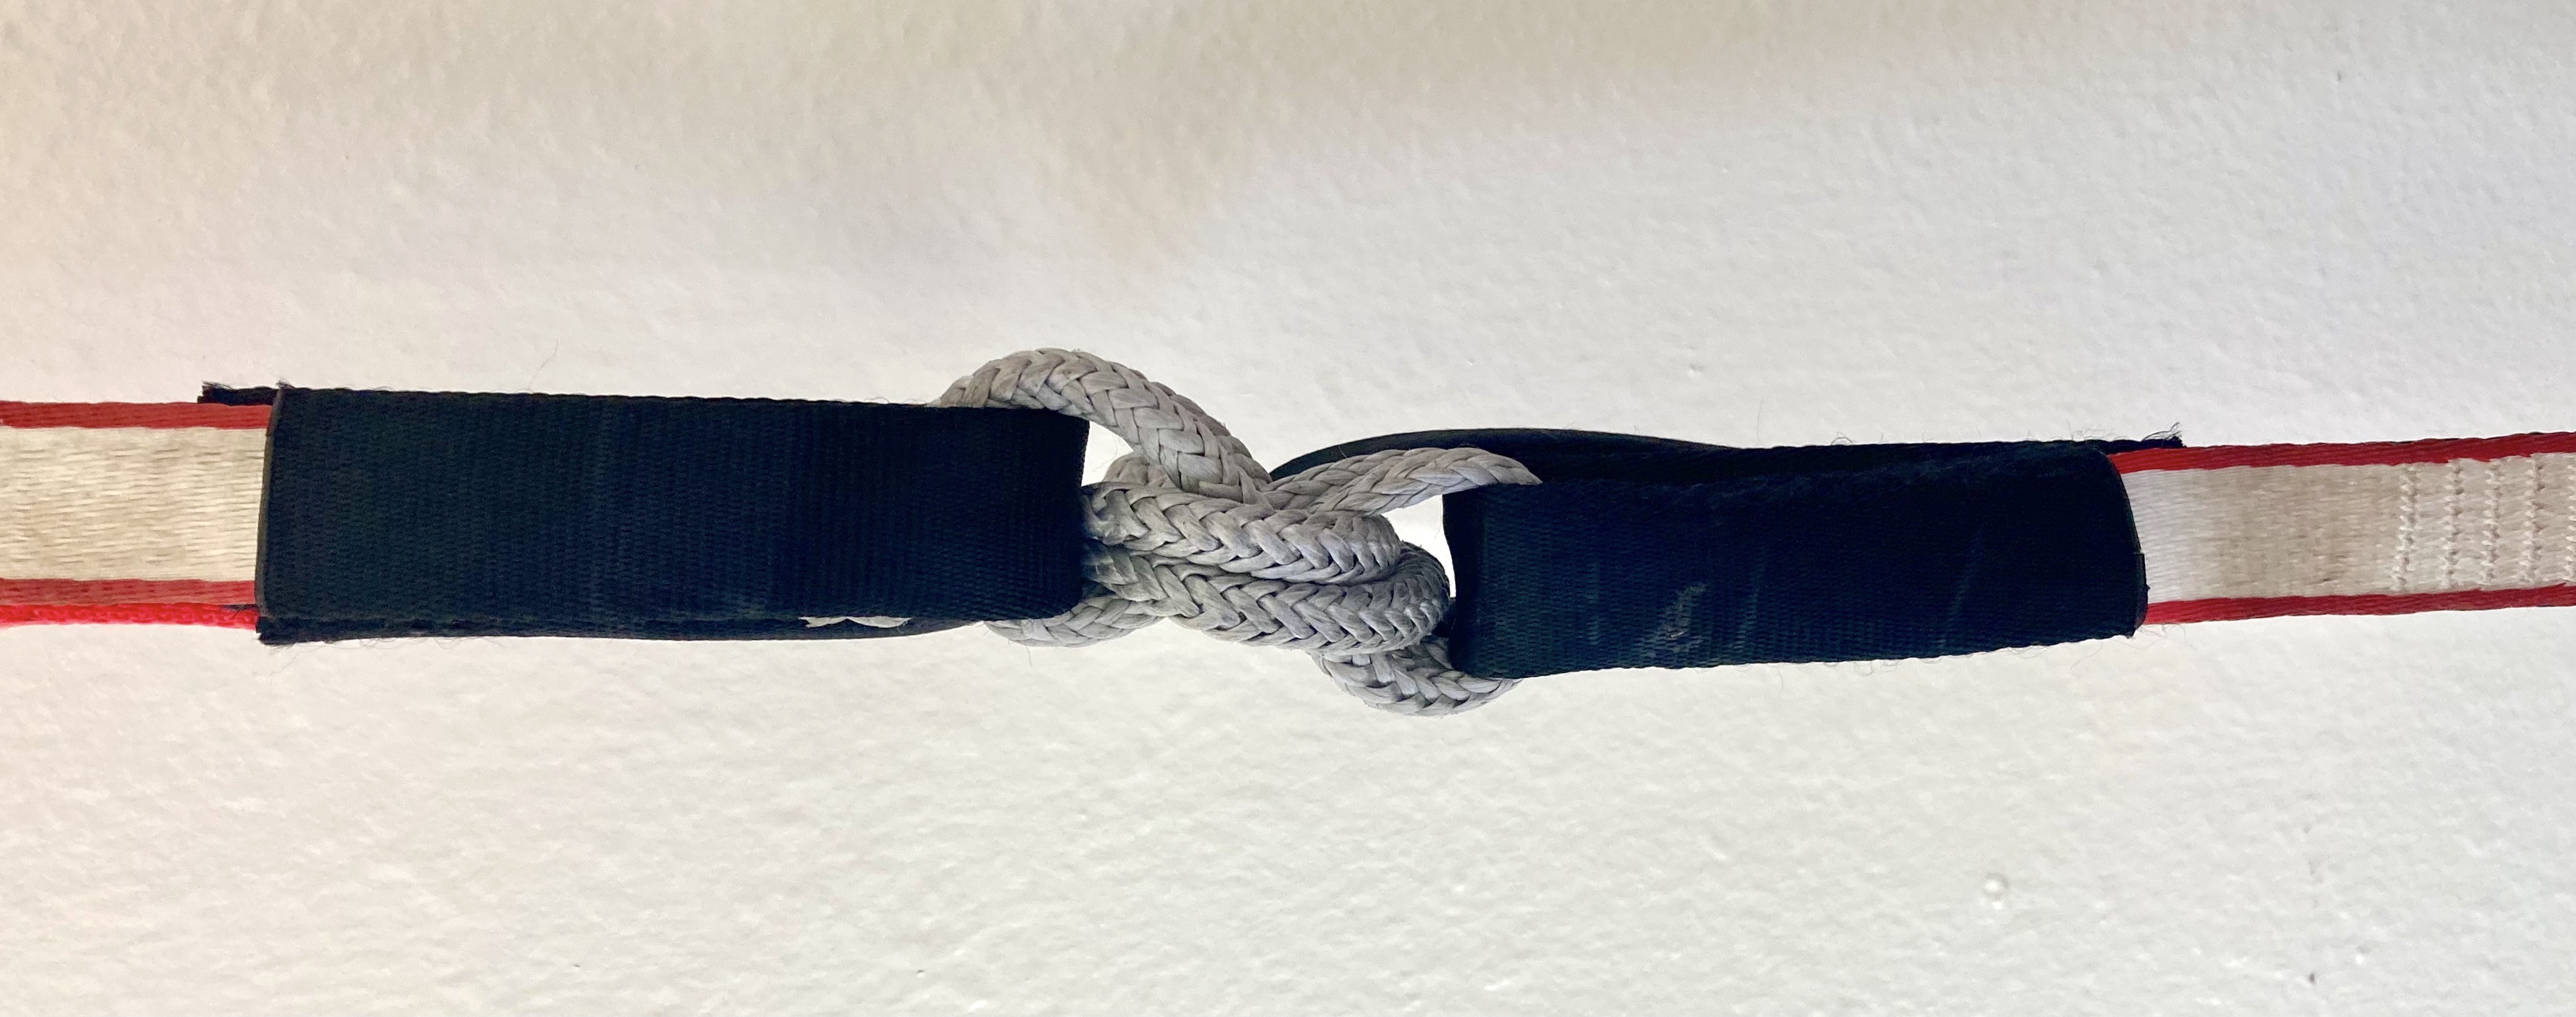
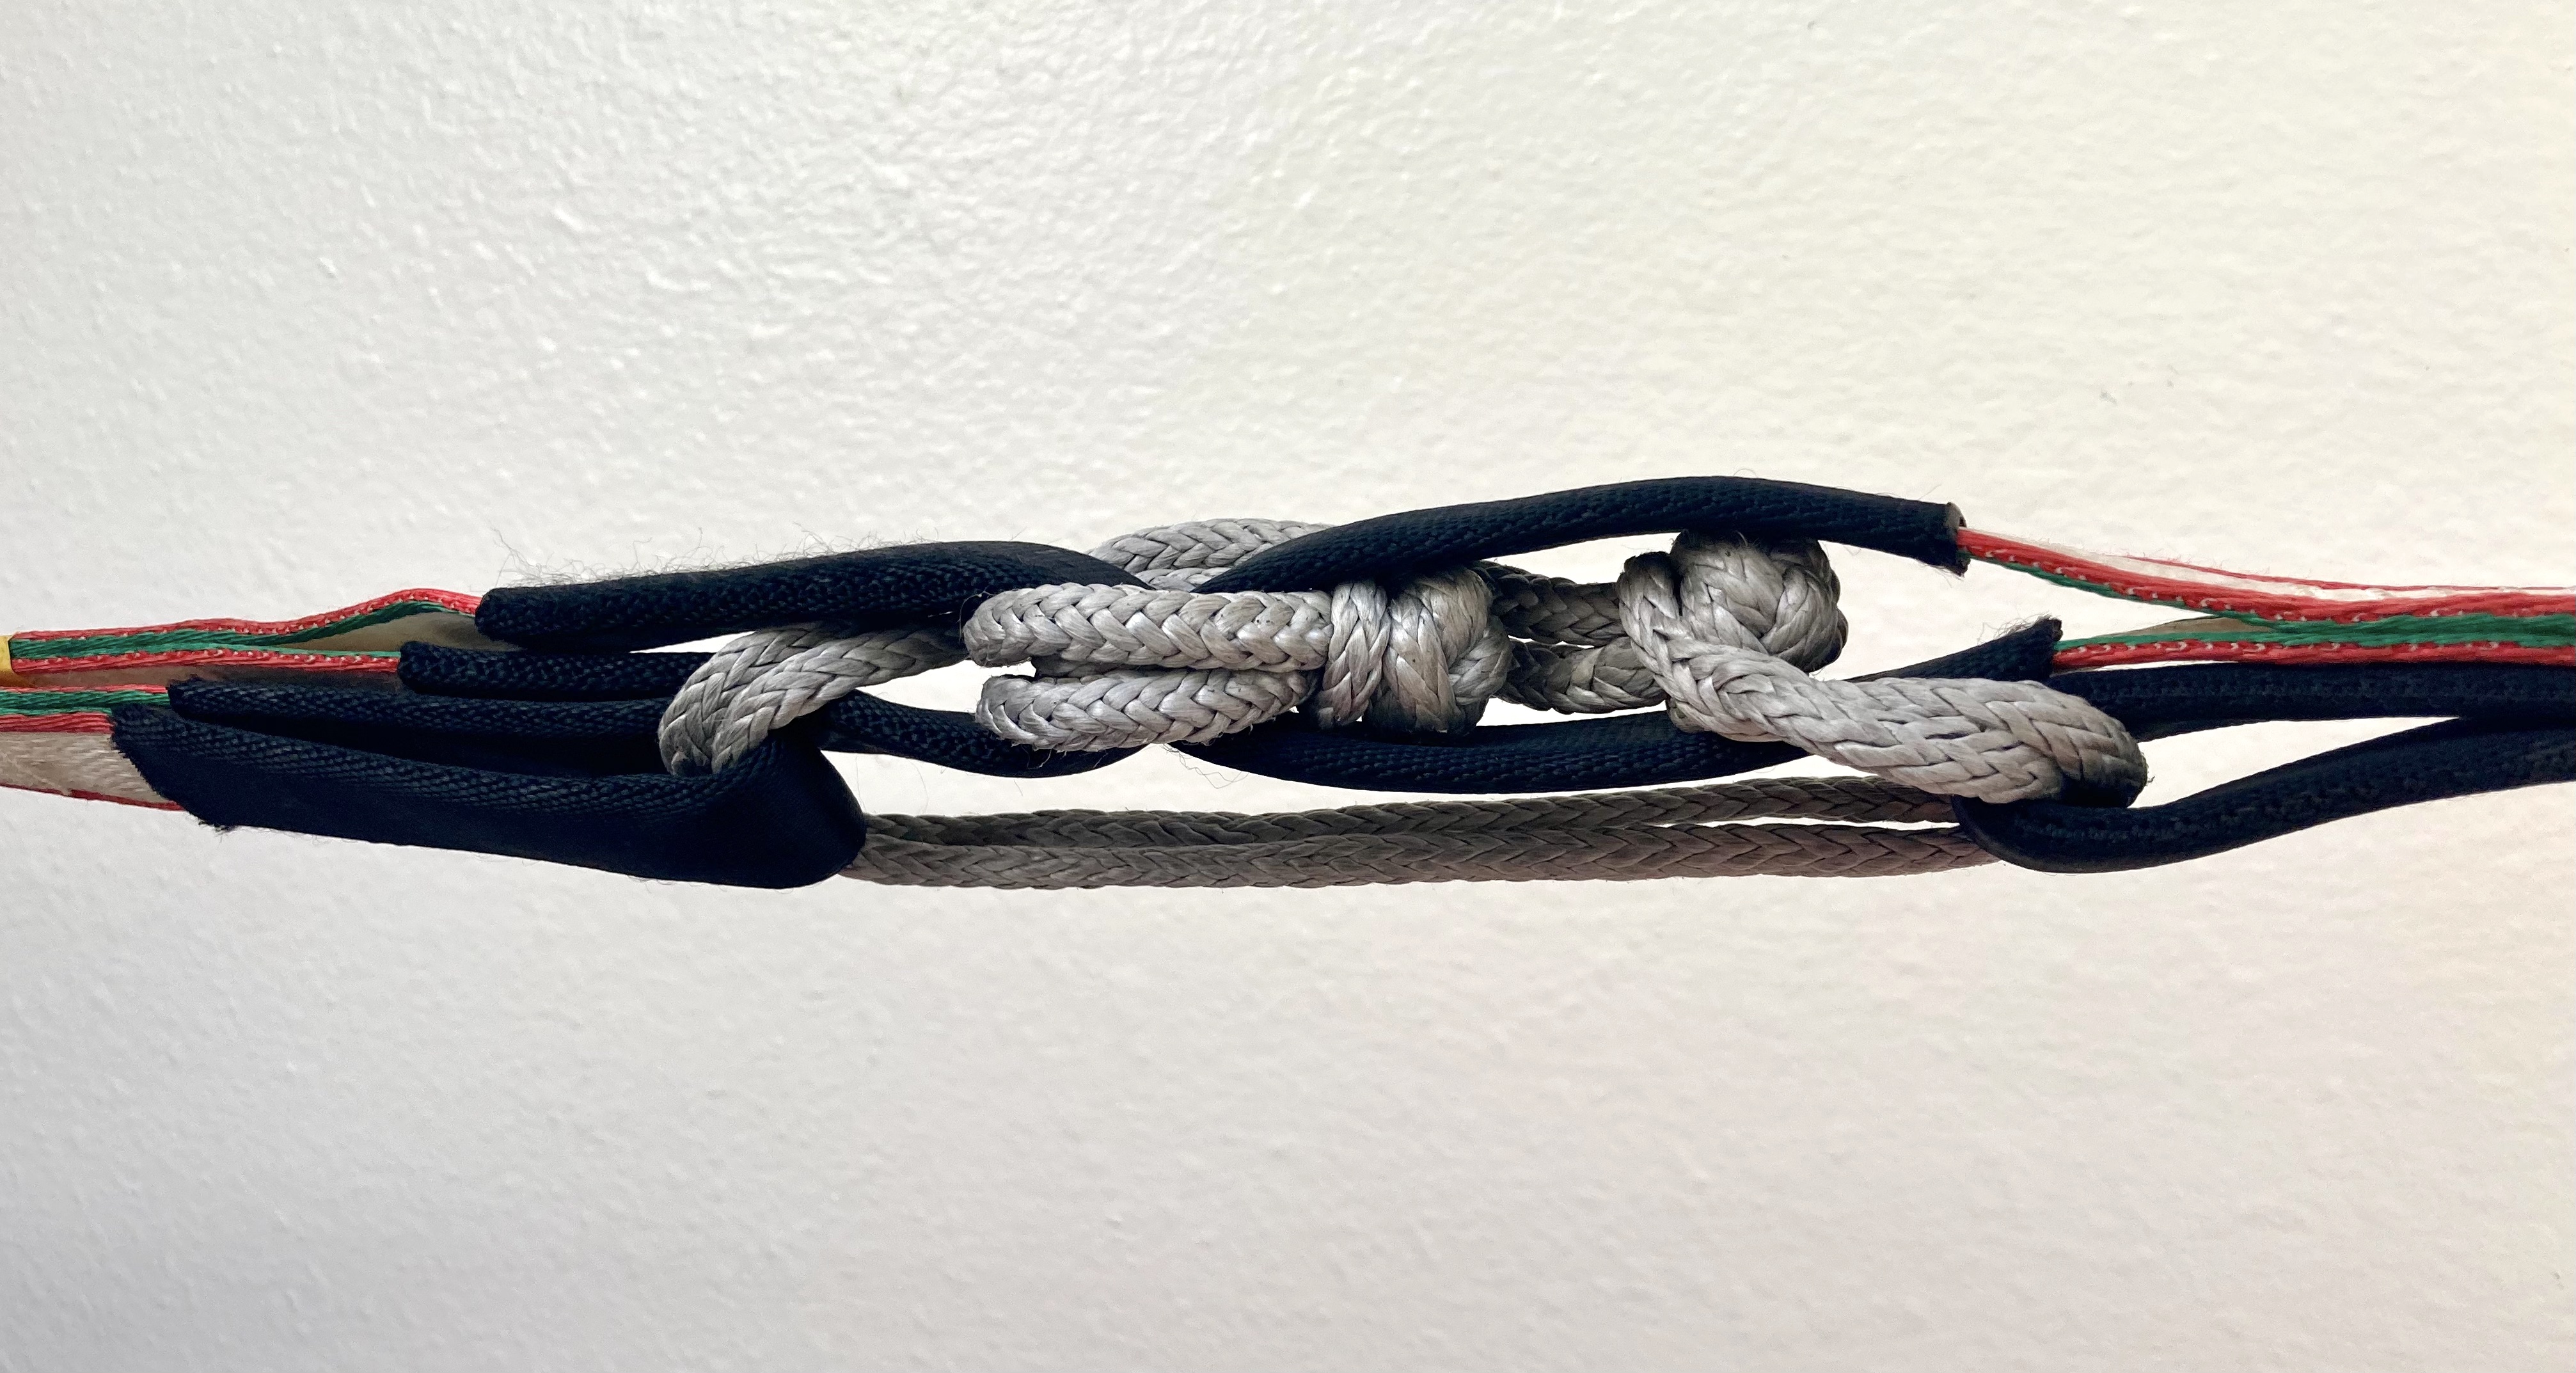
The "Cursive W" split system with two soft shackles. Structurally, this is very similar to "the W" shown below, but the long soft shackle crosses back and forth to connect to all of the loops. The 5mm soft shackles shown here are each ~45+ kN, and are suitably strong for split connections. The double wrapped soft shackle connecting the main loops should be twice that strength.
A connector with a strength in the low-to-mid 30s should be sufficient for almost all highline webbings on the market now. 5mm button knot soft shackles, 5mm grog slings doubled, 4mm button knot soft shackles doubled, and most 8mm quicklinks will have a strength ~35+kN. Some heavier nylon and polyester webbings or older high tech webbings have strengths of above 40kN, and it is likely that the next generation of high tech webbings will be stronger, so there may be an incentive for stronger connectors for some users.
In some split setups, two connectors can be used in such a way that they share load. In theory, you can add the two connectors’ strengths together if the load is perfectly shared, but in order to preserve redundancy, each connector should be strong enough on its own.
# Redundancies
Split highlines offer major safety advantages over traditional single strand highlines, but require paying much closer attention to redundancy. Between the anchors, a traditional highline requires one redundancy: A backup in case the mainline fails. Split highlines, however, have many required redundancies that can depend on the system used: What if one mainline fails? What if the other mainline fails? What if both fail? What if a connector fails?
When presented with a new split system, it can be hard to go through every possible failure mode. A typical test is to pull (with your hands) on both mainlines, then both backups, then each separate combination of main and backup, and make sure each can correctly oppose force and loads the connectors well.
The pull test ensures redundancy of your webbing, but it’s also important to test the redundancy in your connection. When doing the pull test, pay attention to which connectors are loaded in which situation, and how they are loaded. It’s a good idea to remove one of your connectors and see what happens when you repeat the pull test. Once you’re satisfied that that connector is redundant, put the split back together and remove the other connector.
This may seem like a lot to test, but redundancy has prevented countless highline accidents from becoming serious or fatal. Remember that the key to redundancy is that any one part of the system can fail without the whole system failing. What does it mean for the system to fail? It may mean different things depending on the situation, like on a low midline, where the backup may be intact, but the system failed if a backup fall led to the slackliner hitting the deck.
# Prevention of Cascading Failure
Any split connection should prevent cascading failures as much as possible. A cascading failure occurs when the failure of one component leads to other components failing.
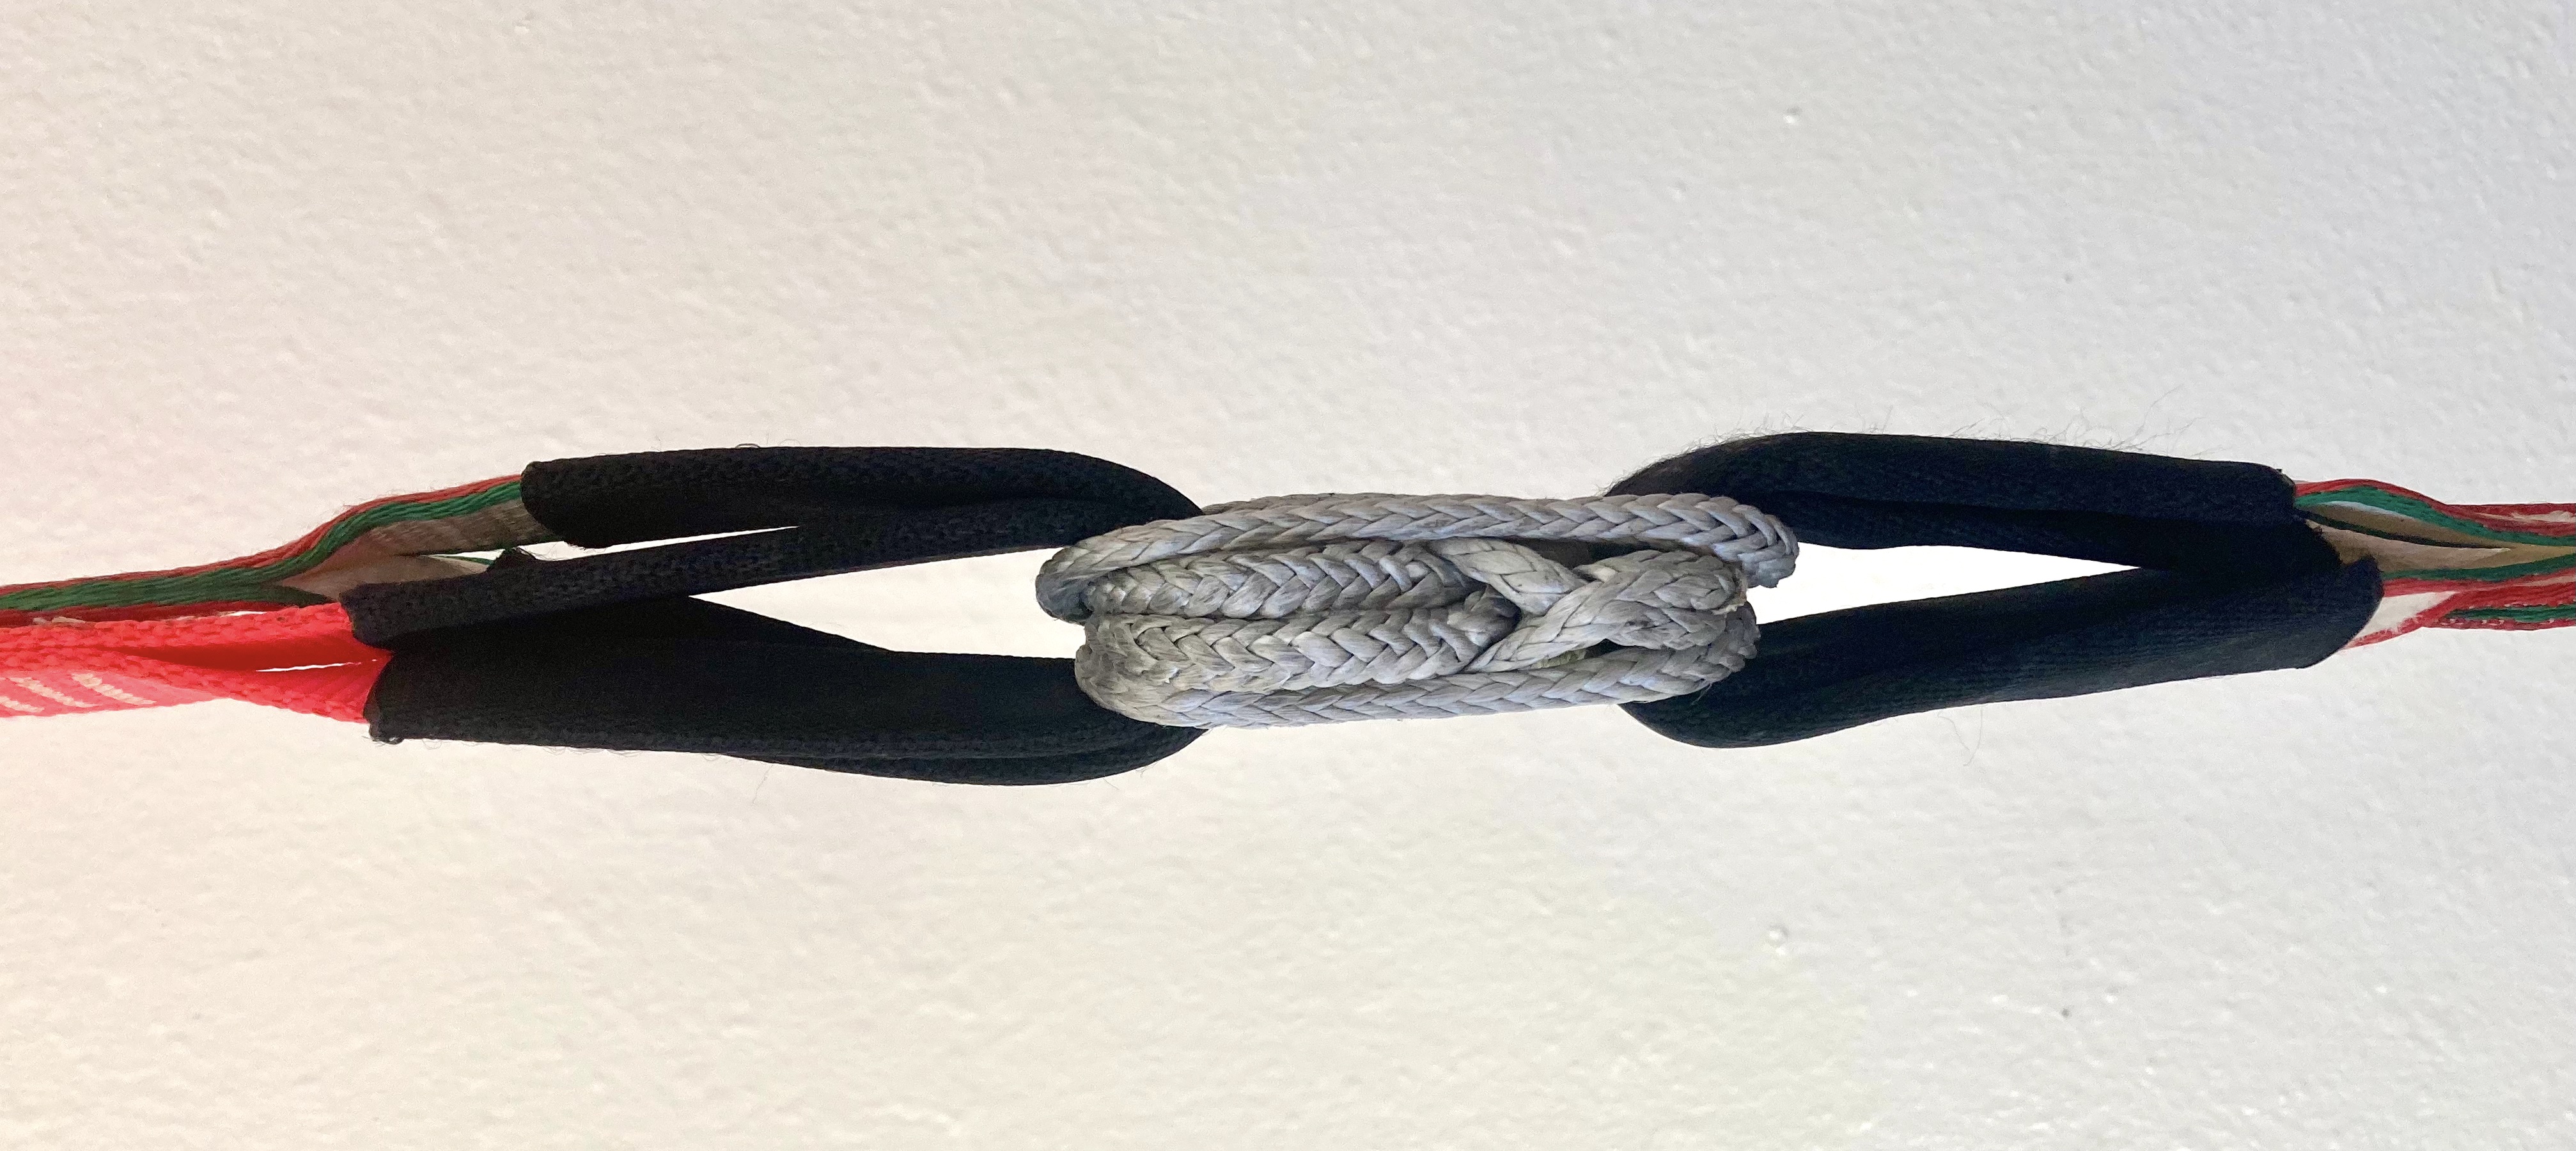
The "Inov Split" split system with two soft shackles. The knots of the soft shackles are tucked inside the sewn loops. In the classic Inov Split, the center soft shackle connecting the two backups is replaced by a quicklink. If the "S" shaped soft shackle were to fail, both mains would be out of the system leading to a double backup fall.
An example of a split connection with cascading failures is the the classic Inov Split, where a soft shackle connects both mainlines in a figure eight pattern, and a quicklink or soft shackle connects both backups to the crossing strands of the main soft shackle. The system is fully redundant, because no single piece failing leads to failure of the whole system. However, because the backup loops are not connected directly to the opposing side main loops, the system is set up for a cascading failure in the case of main soft shackle failure. If the main soft shackle fails, the line drops onto two backup segments, which is equivalent to both main segments failing. The failure of the main soft shackle cascades through to the segments it was connecting, resulting in a large fall.
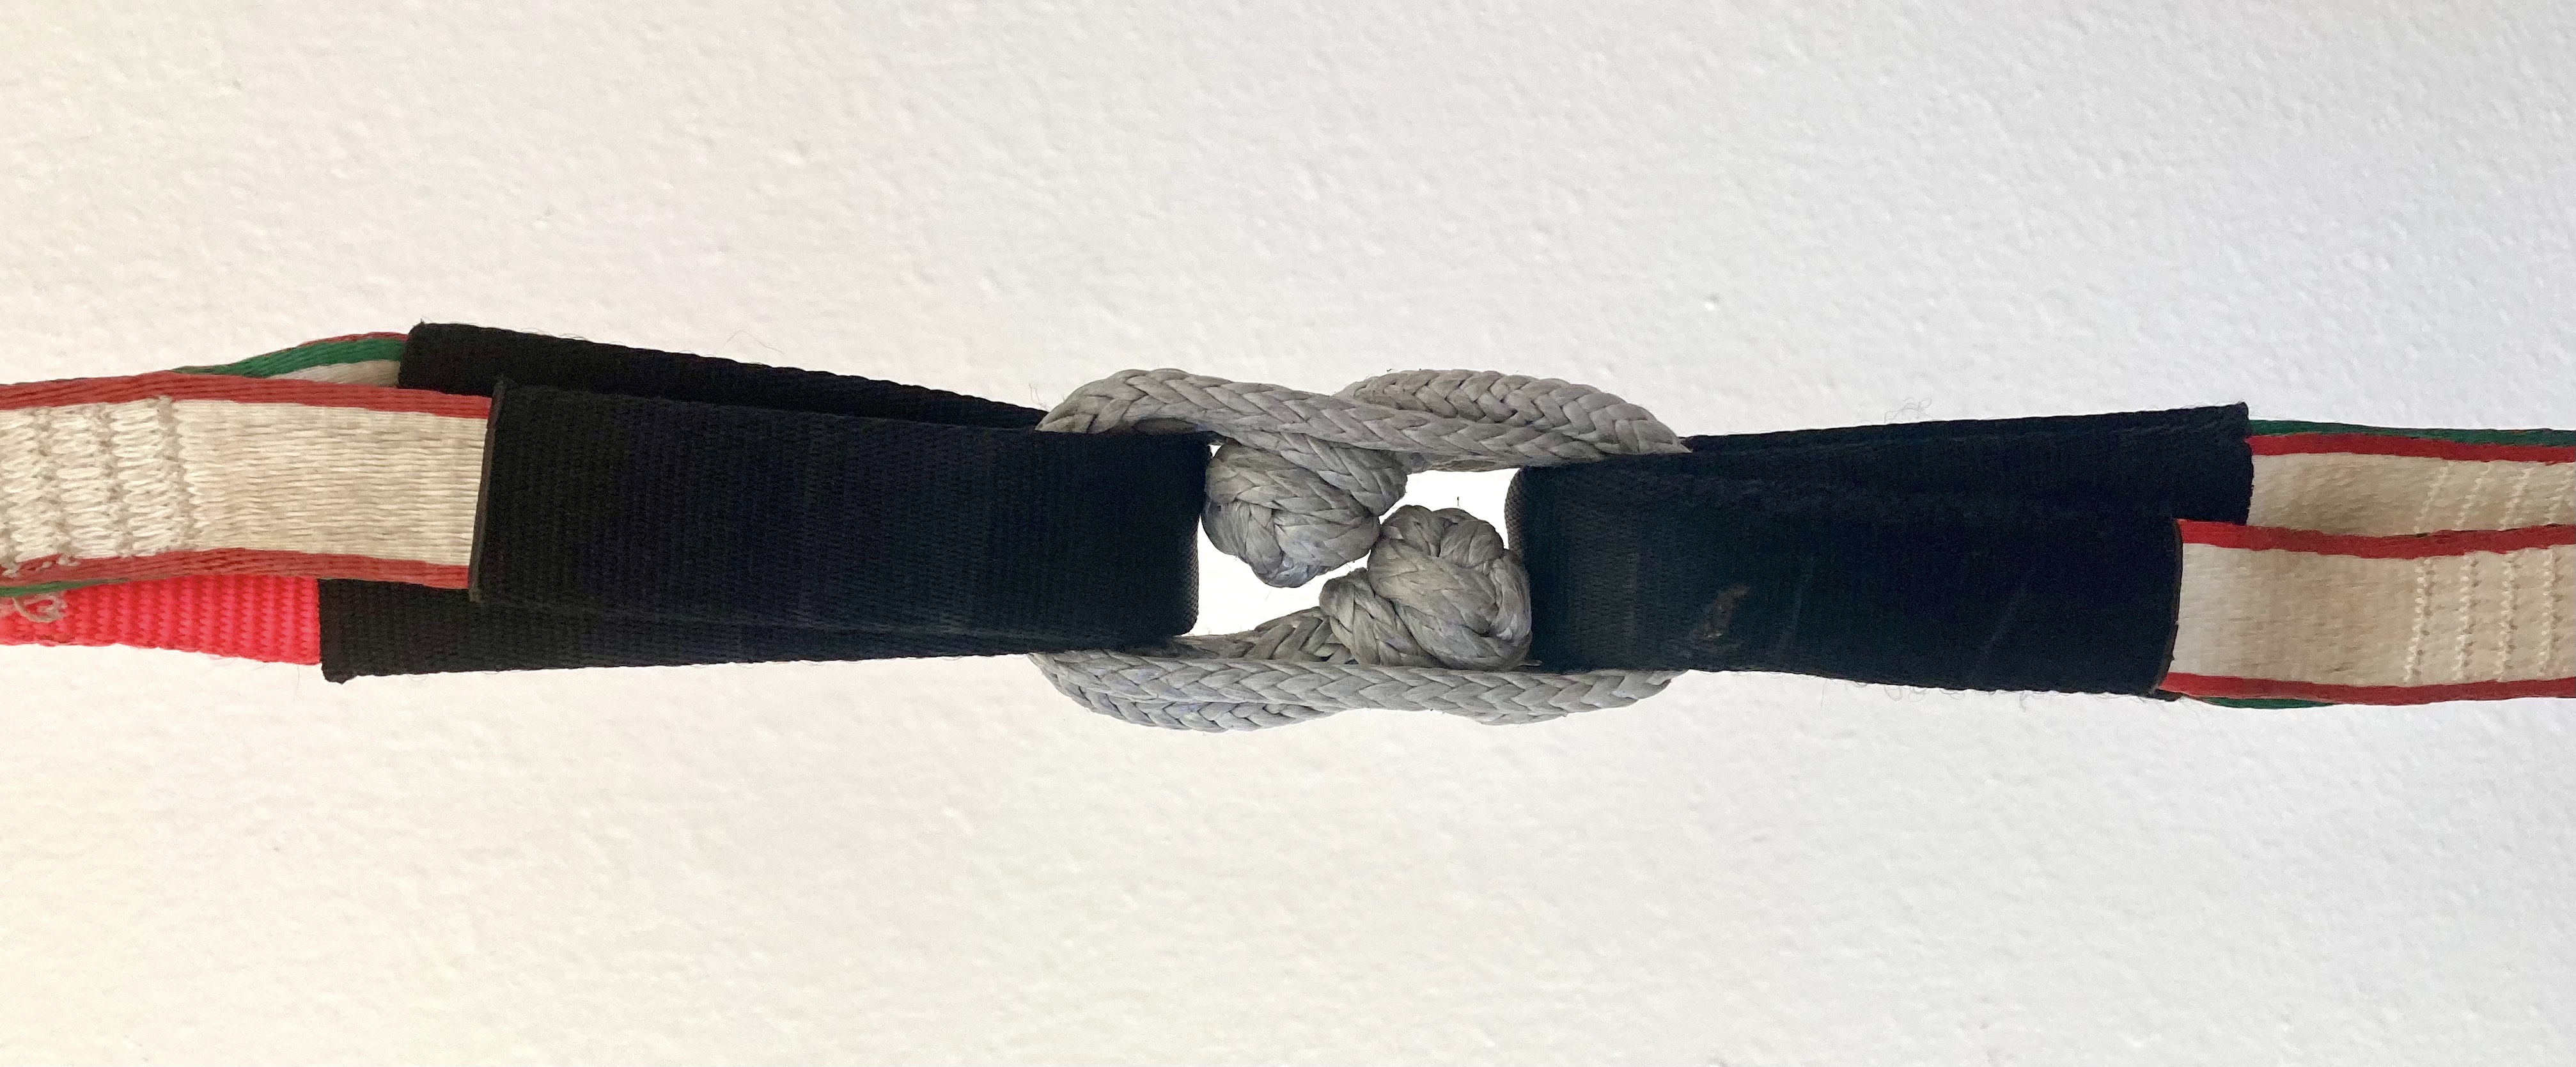
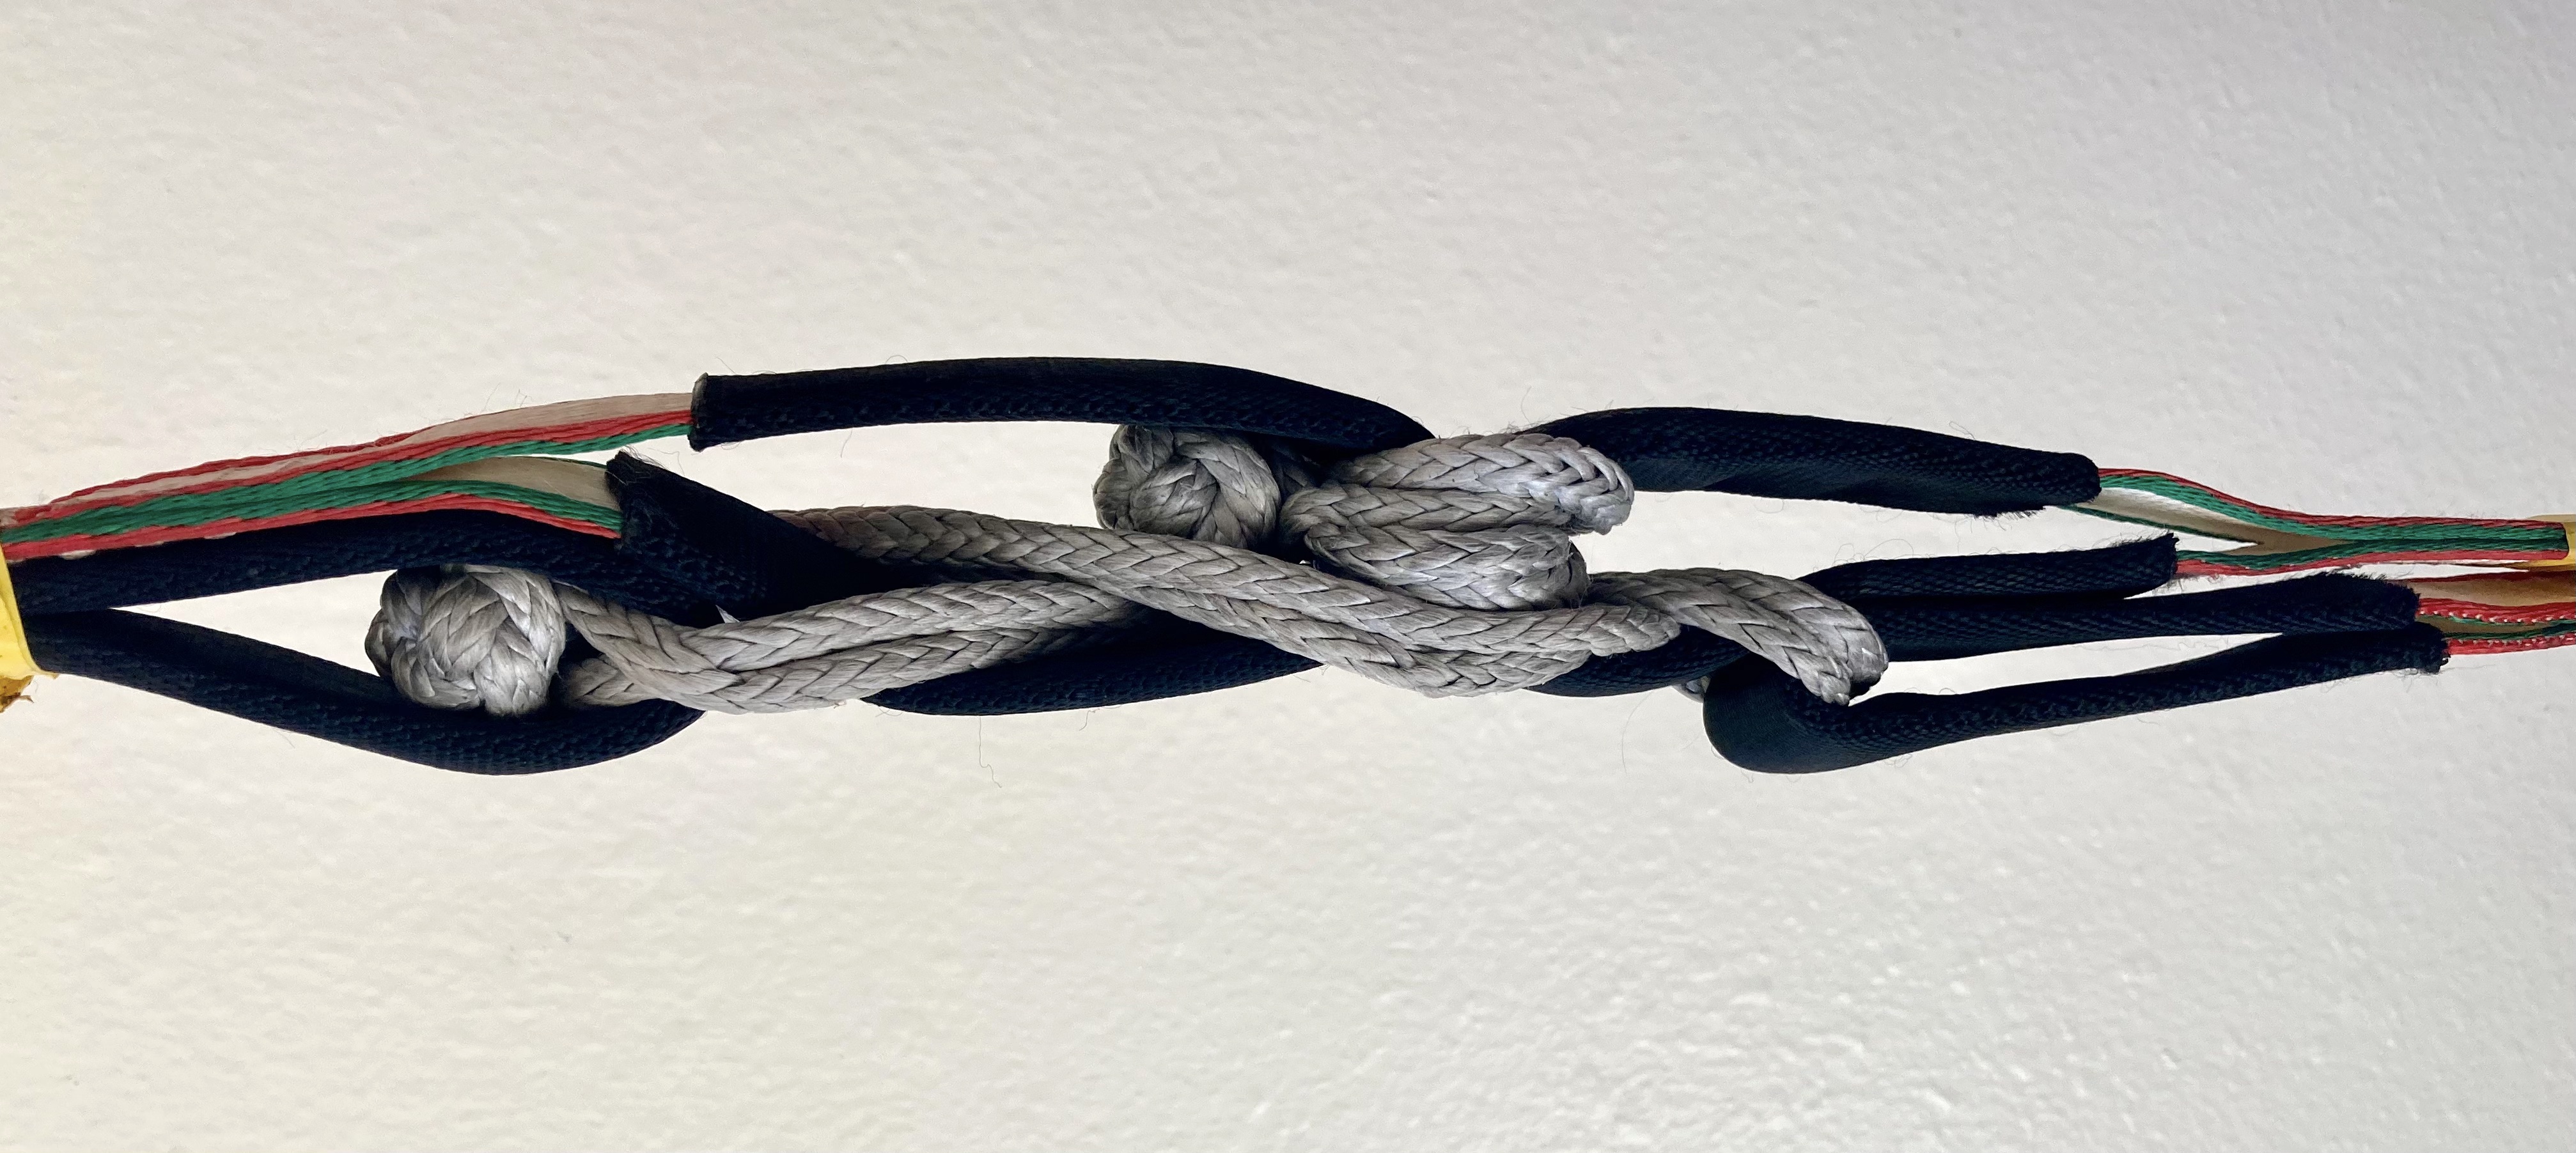
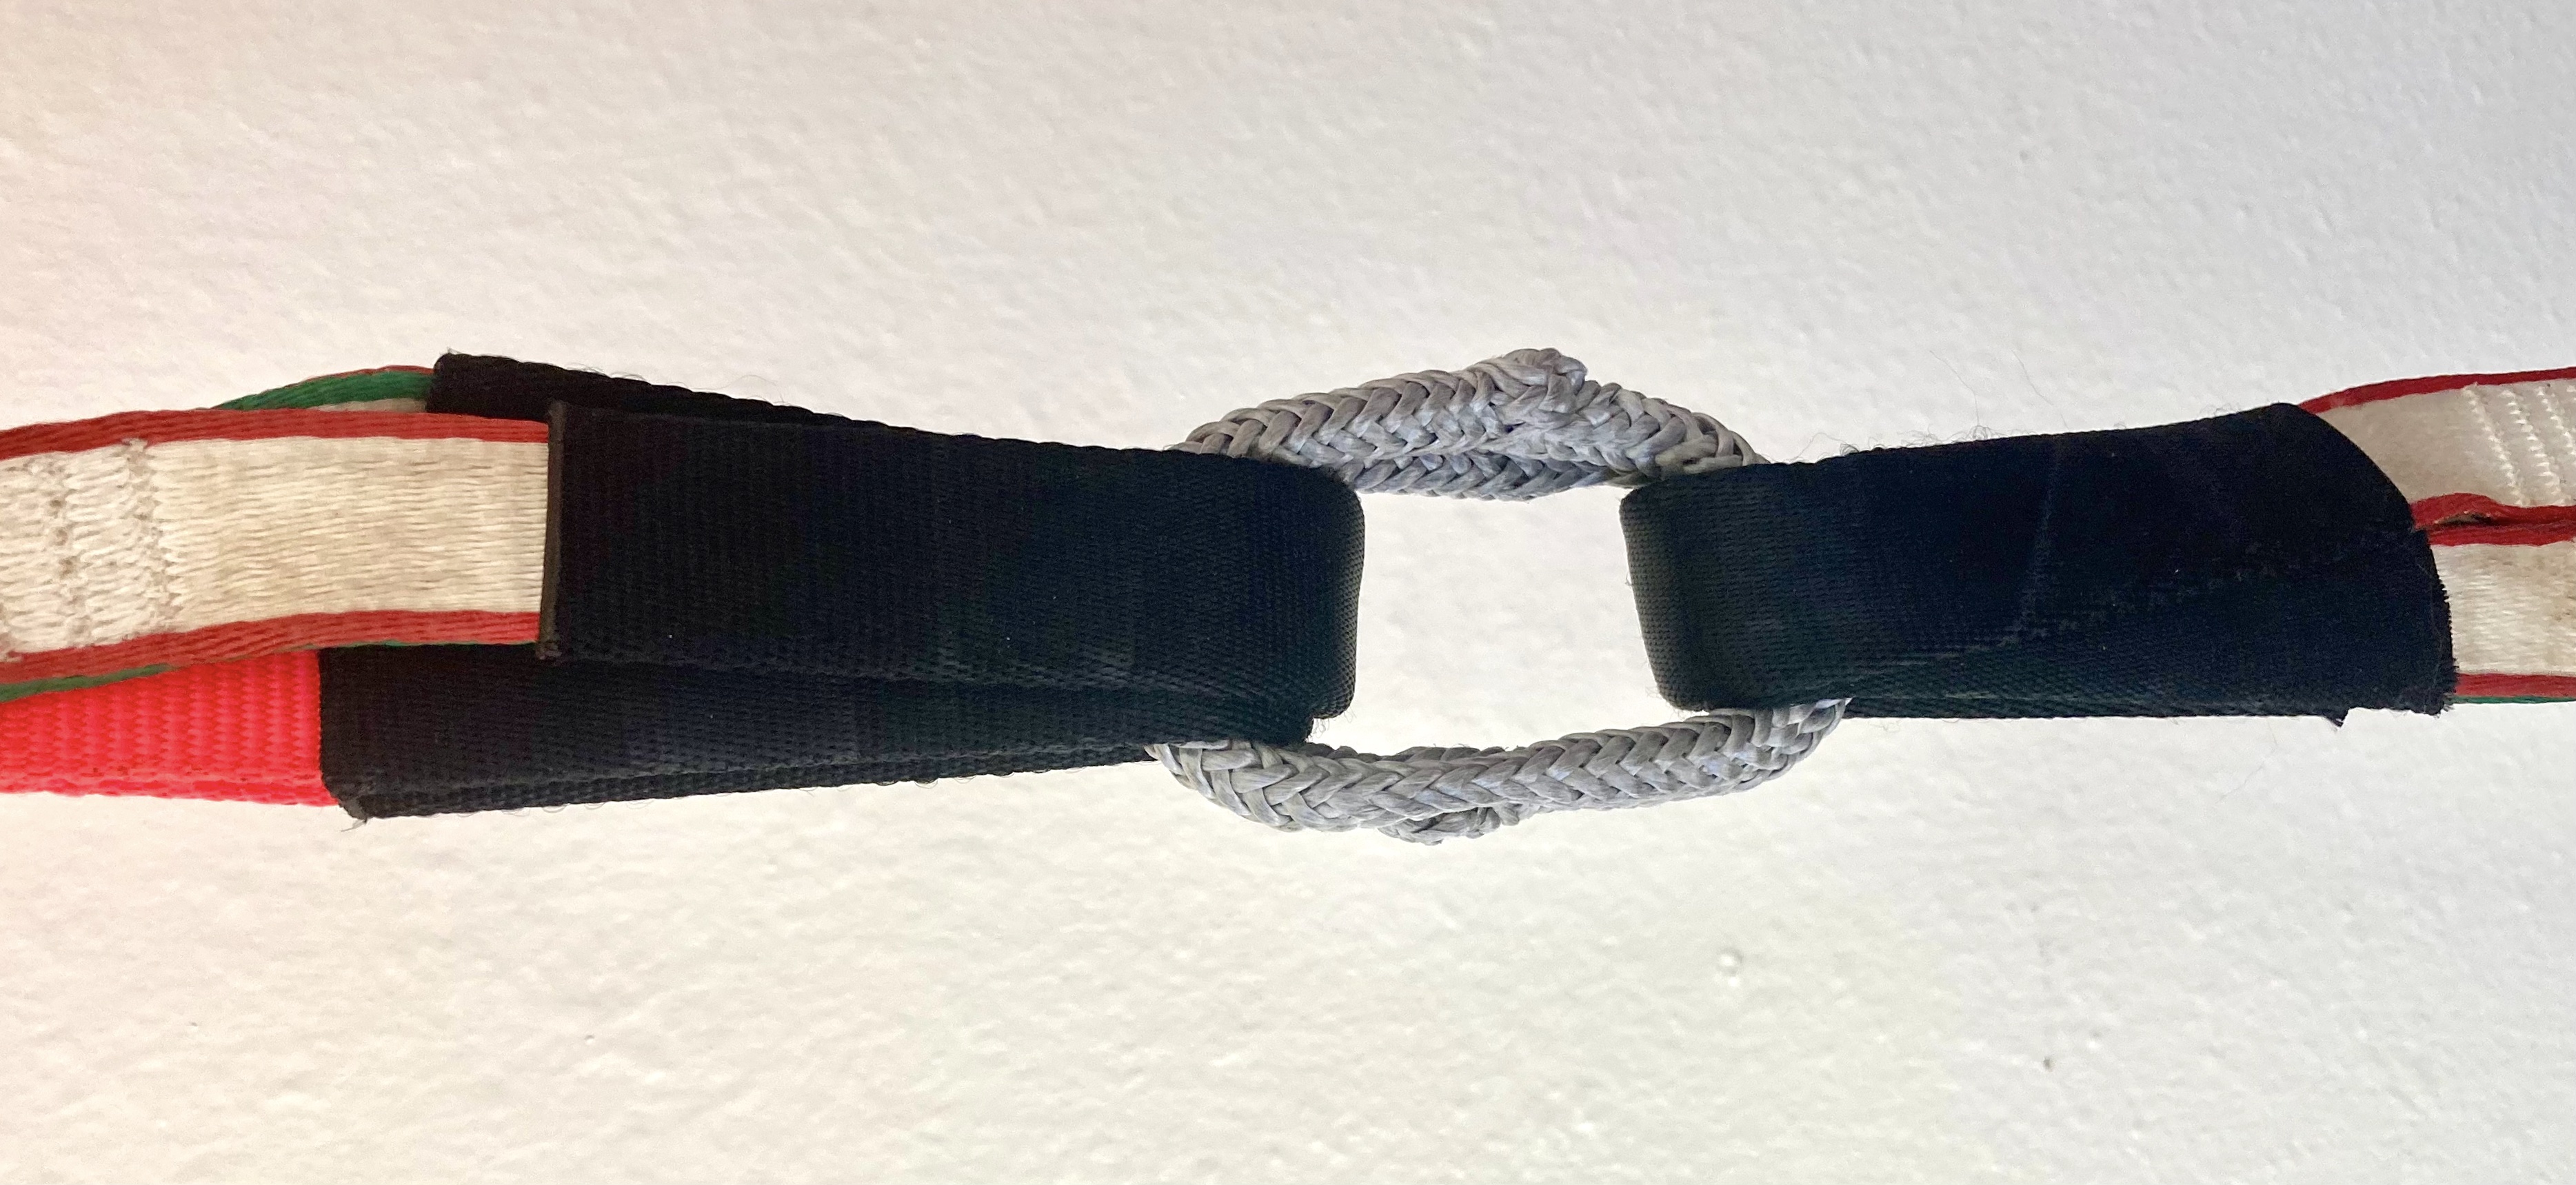
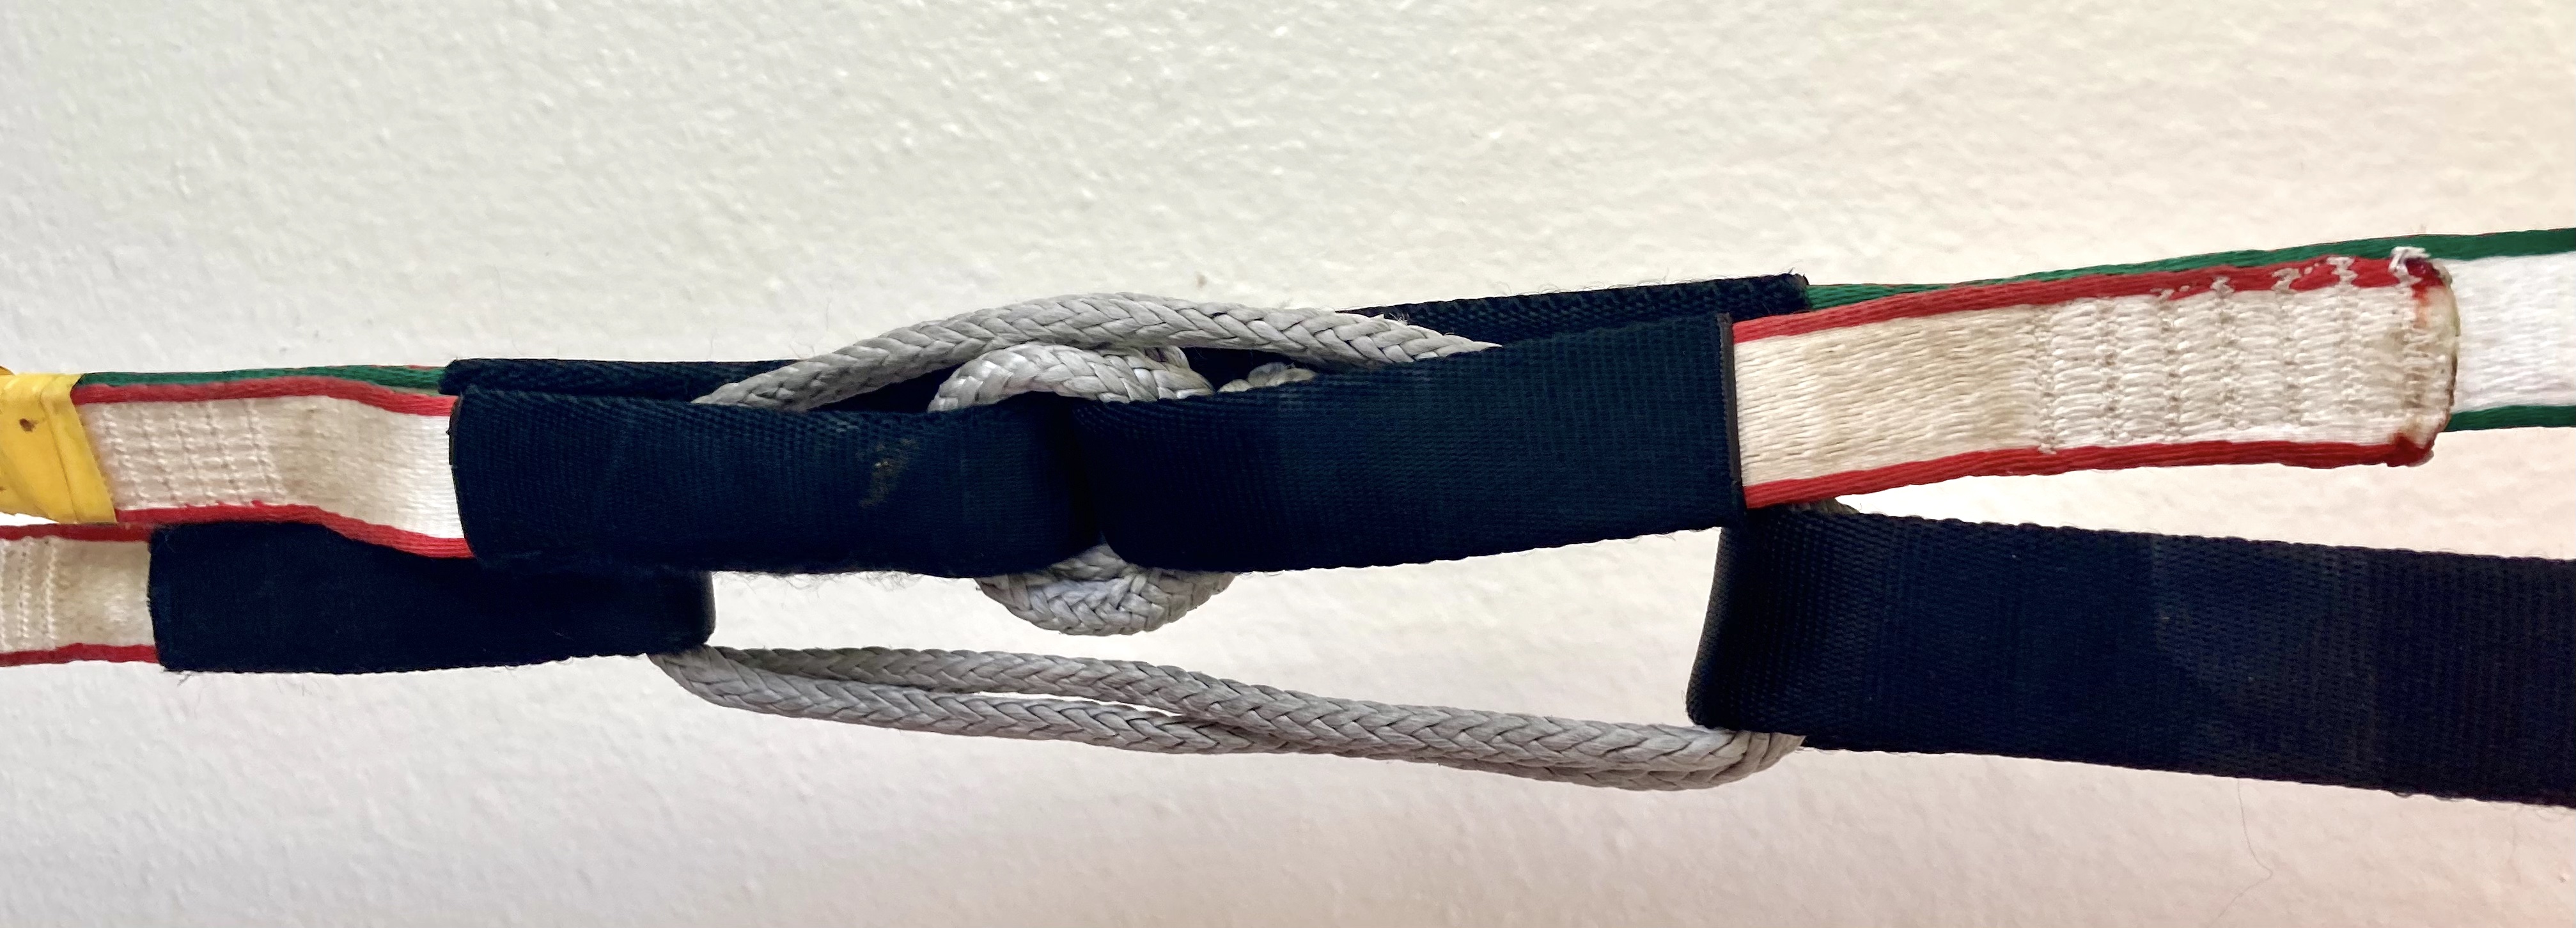
The "through-all-four" or "two-through-four" split system with two soft shackles. The knots of the soft shackles are tucked in the gap between the loops. The backups are tucked inside the main loops to act as thimbles, and are tucked from opposite sides to prevent rolling.
To see how this is avoidable, consider the “through-all-four” split system, where two soft shackles each go through all four (two main, two backup) sewn loops, often with the backup loops stacked inside the main loops. Both soft shackles share load, and connect to the same points in the system. Now if one soft shackle fails, nothing else in the system is affected. We have lost redundancy at the split, but nothing else has failed. Importantly, a large fall has been avoided, and redundancy has been preserved across both segments.
At its worst, a cascading failure means that one component failing leads to the whole system failing. Proper redundancy prevents this by ensuring that any one component of the system can fail without the system failing. But even with full redundancy, a cascading failure can turn a small mistake into a big mistake. Not only is falling onto two backup segments a serious risk of groundfall on many lines, but it now requires a rescue off of a line with two segments worth of lost redundancy. Cascading failures generally come with a cascading loss of redundancy, and in the conditions that are most likely to cause highline failures (adverse weather and user error), you want all of the redundancy you can get. Remember, most major accidents are the result of multiple bad decisions - do your best to insulate your bad decisions from each other.
# Security
The security of a split connection refers to how securely attached the different webbing segments are. Can the connectors shake open under vibration, or be unintentionally opened if stepped on or hit during a leashfall? We all know a forged metal leash ring is a secure attachment for our leash to the webbing, but a carabiner is not. How do we evaluate the security of our different connection systems?
Quicklinks are often thought to be the most secure connection method, perhaps due to the psychological effect of having a solid piece of metal in the system. But quicklinks are not a solid piece of metal. If a quicklink is not fully screwed shut, it can fail much lower than its rated force. It is best to think of a quicklink as being only as secure as the last turn of its closure. If using quicklinks in split connections, always use a wrench to tighten them. Even then, quicklinks have been known to fail on split connections due to the vibration of an extreme wind event. Some people will tape the closure of their quicklinks shut after wrench-tightening them to help prevent movement from vibration.
Soft shackles are often seen as a less secure option for connections compared to quicklinks, but there are no documented cases of soft shackles opening when used in a split connection ( If you know of any, please file a SAIR report through the ISA). Like quicklinks, they can be taped shut by applying a small amount of tape at the noose. The most secure method for using soft shackles is most likely just keeping all soft shackles under tension, which can be achieved by a “through-all-four system.” Some people employ one of two different varieties of “locking soft shackles,” where either the noose or the knot is passed through the legs of the soft shackle before putting the noose over the knot, but it is unclear if there’s any advantage to this method.
Grog splices used in a "through all 4" split system instead of soft shackles. Note the significantly reduced side profile.
Grog splices appear to offer the best in security, as they are connected with a brummel splice, although more real world use is needed to confirm this. As they become more commonly used, we will know better if this reasoning is correct. Lock stitching the tail buries can make them almost perfectly secure, at the cost of more time connecting and disconnecting.
# Minimization of Movement
Movement in a split connection can’t be fully avoided due to the dynamic nature of highlines, and it has been responsible for a numbers of failures on split highlines. Regular movement of the highline can cause a back and forth sawing motion that allows twisted backups, especially those made up of round dyneema backup extenders, to abrade into the mainline. High wind has caused multiple types of split failures, including shaking open quicklinks and causing a soft shackle to be cut by the webbing in a DLV (Dura-La-Vida) connection. During a backup fall, the rapid shift of tension has potential to create a significant amount of heat if there is movement within the split, as there is in many connection styles. We can’t fully avoid movement in our highlines: in the case of wind and backup falls, we try our best to avoid them but can’t guarantee that we will, and regular movement of the highline is a core part of why we highline. The best we can do is mitigate its effects by choosing good split setups.
Split setups should be chosen to avoid the potential for movement related failure modes like cutting, abrasion, and heat (vibration is another failure mode that is mostly an issue for quicklinks). The first step is to decrease the potential for explosive shifts during backup falls, as the fast shifts create potential for cutting and abrasion and can generate significant heat. Ideally, there is no difference in how the connectors are loaded during normal use vs during a backup fall. The Y2K system is a good example of very limited movement because as long as the backup connector is small enough, the two backup loops do not have the ability to move in the connection. The classic Inov Split has too much movement: because the backup connector is attached to a sliding x on a soft shackle, whichever mainline breaks is going to cause a shift in both the main soft shackle and the backup connector.
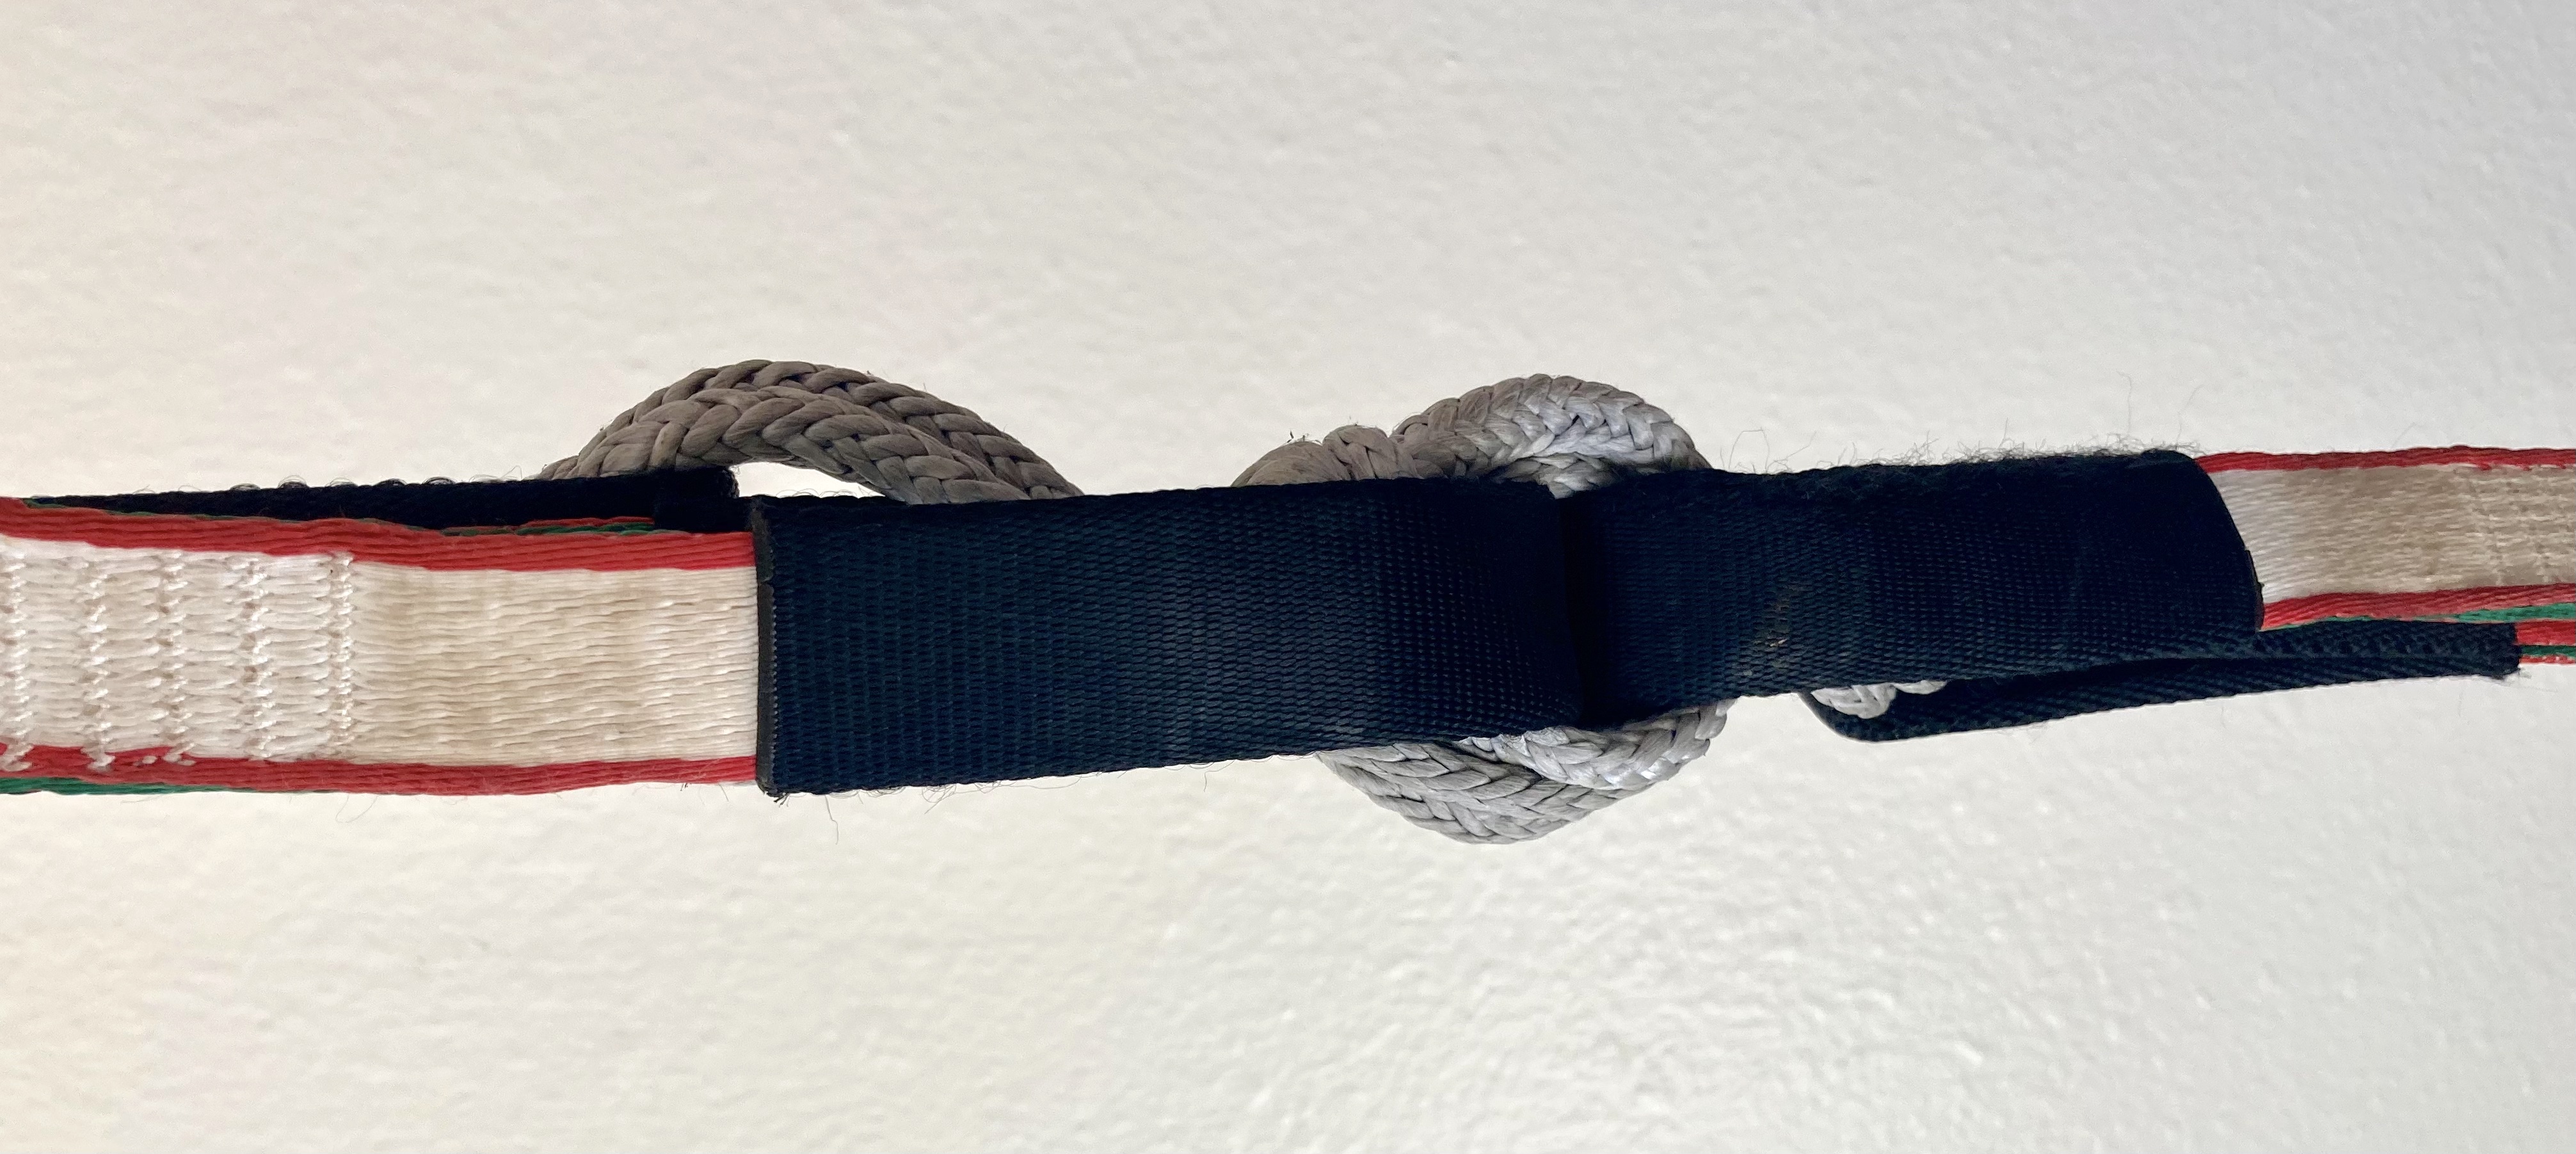
"Dura La Vida" connection with two quicklinks. Note the gap in the sewing on the right that allows significant back and forth motion.
Beyond just explosive movements during a backup fall, splits should minimize the possible movement in its “standard” configuration as well. The “through-all-four” split is the best at minimizing movement. Because everything in the split shares tension, there is little potential for extraneous movement. The shared tension also prevents explosive movements in a backup fall. The DLV split is particularly bad at minimizing movement due to its large size, required by the sewing. This extra space allows the connector to move back and forth freely, which is what caused the webbing in a DLV to cut the soft shackle in the incident mentioned above. Although this incident happened in heavy wind, it’s possible for the same effect to happen during a backup fall. While quicklinks would not be cut by the webbing in these scenarios, it’s possible for the quicklink to cut the webbing if it has any sharp edges, which is especially likely if the quicklink has partially opened.
# Ease of Inspection
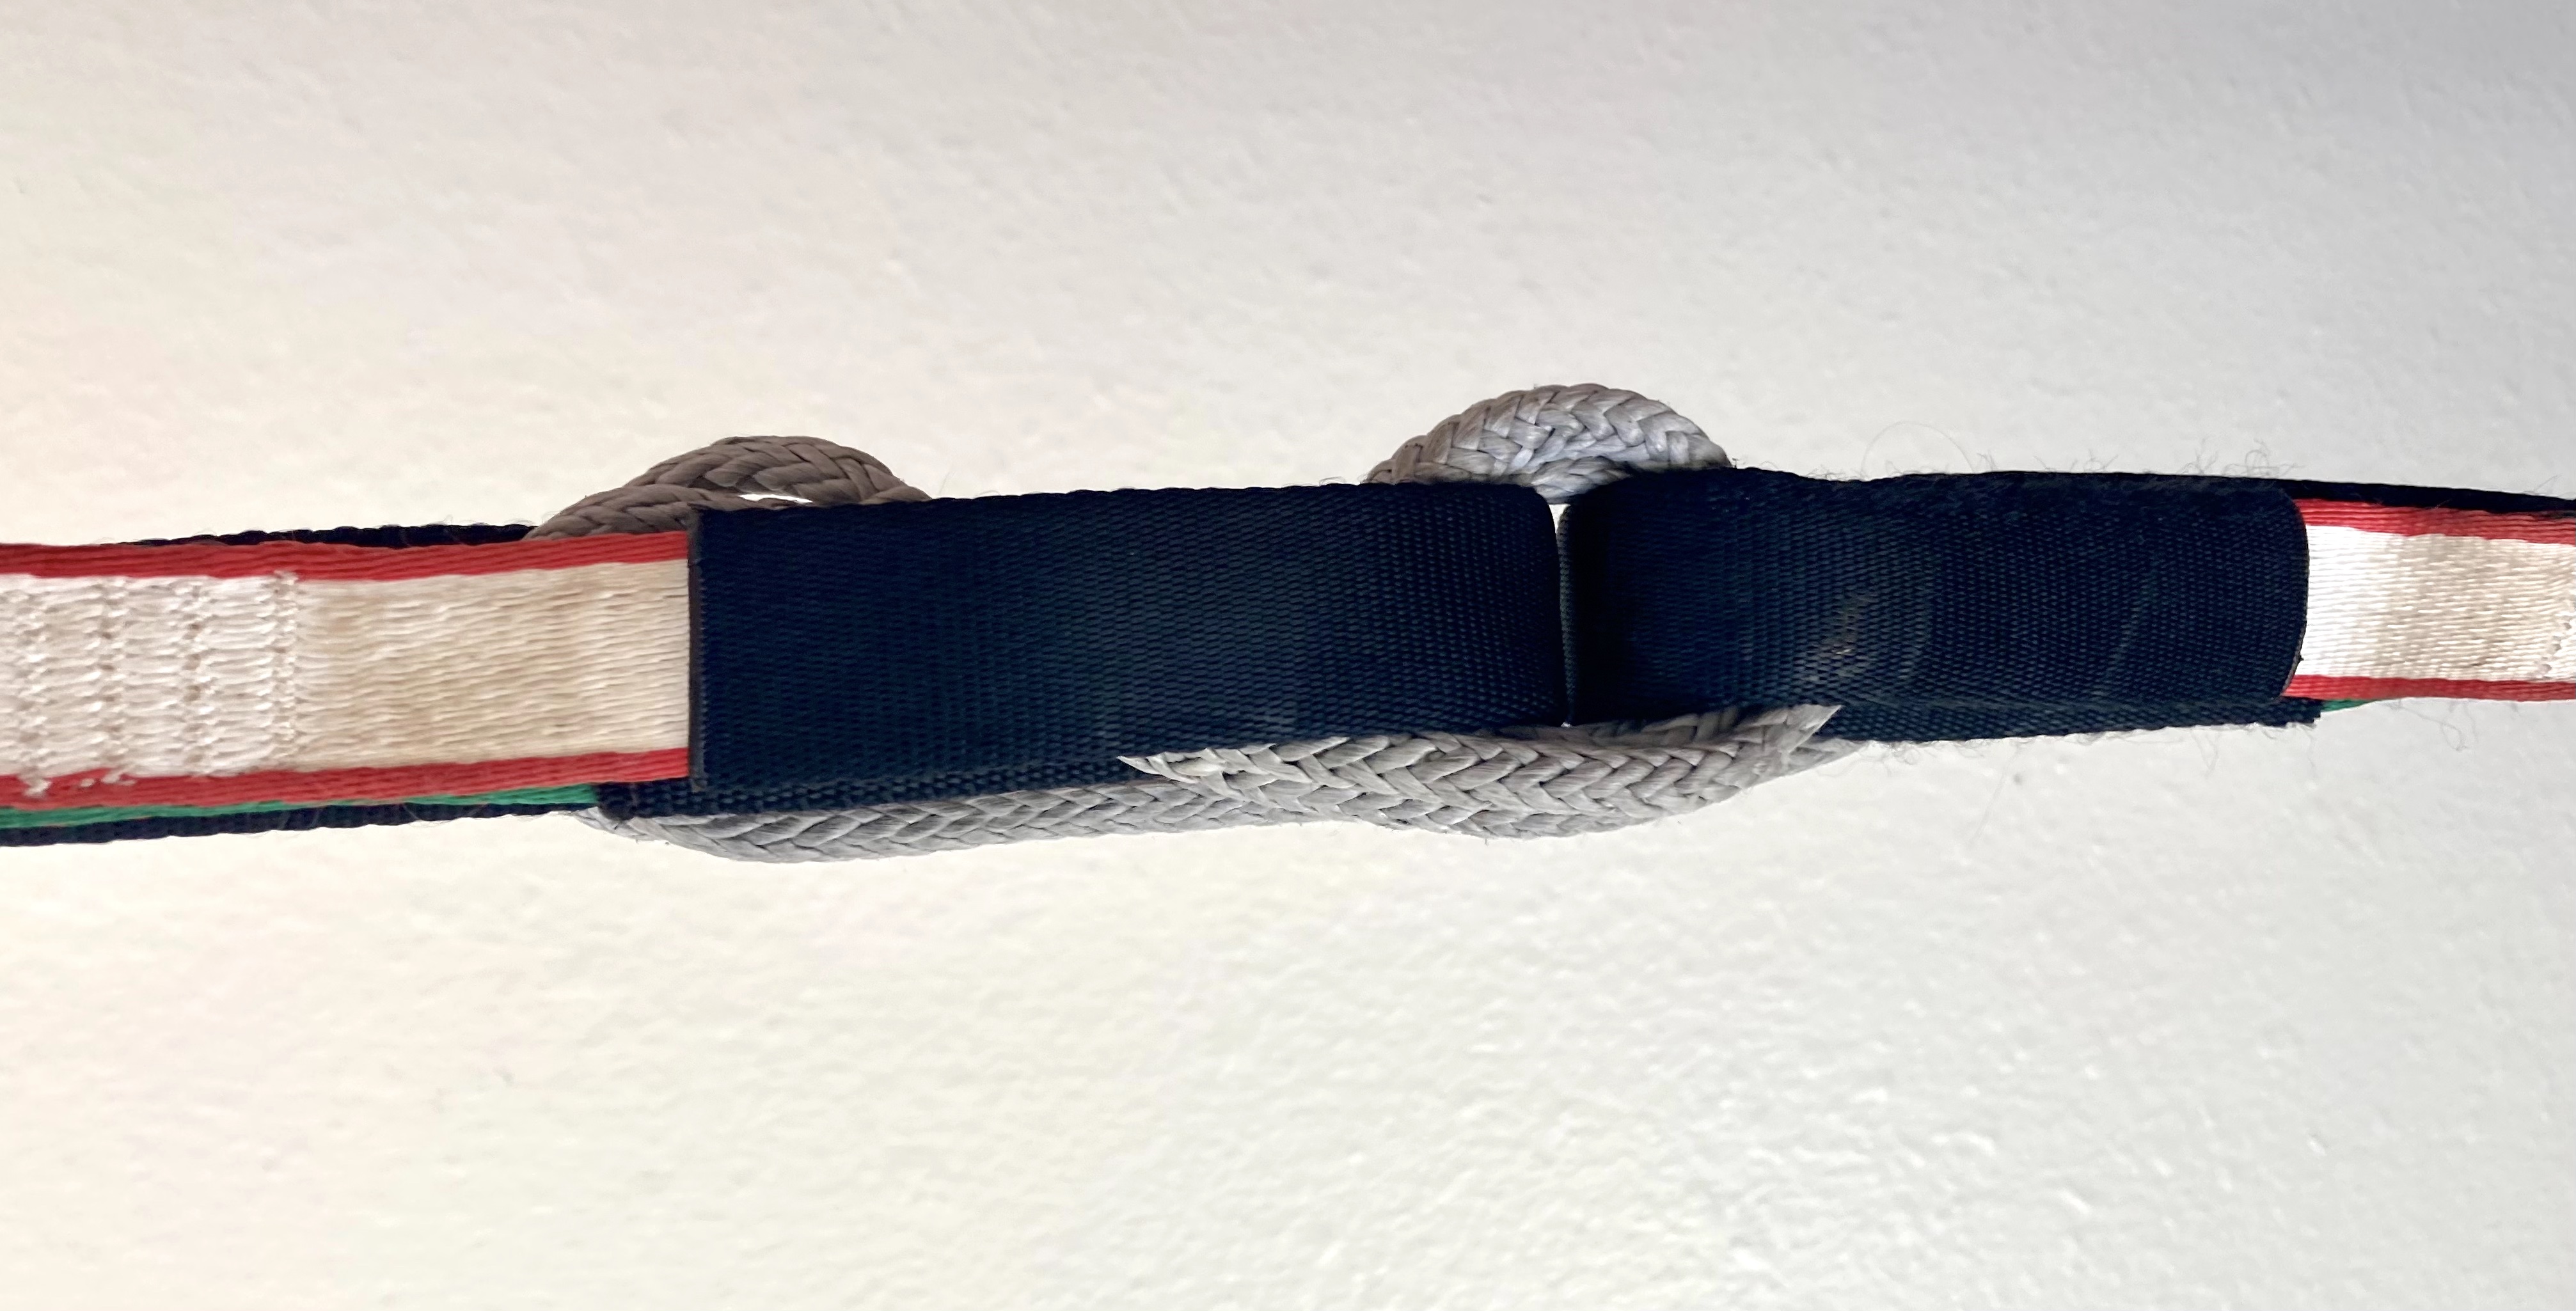
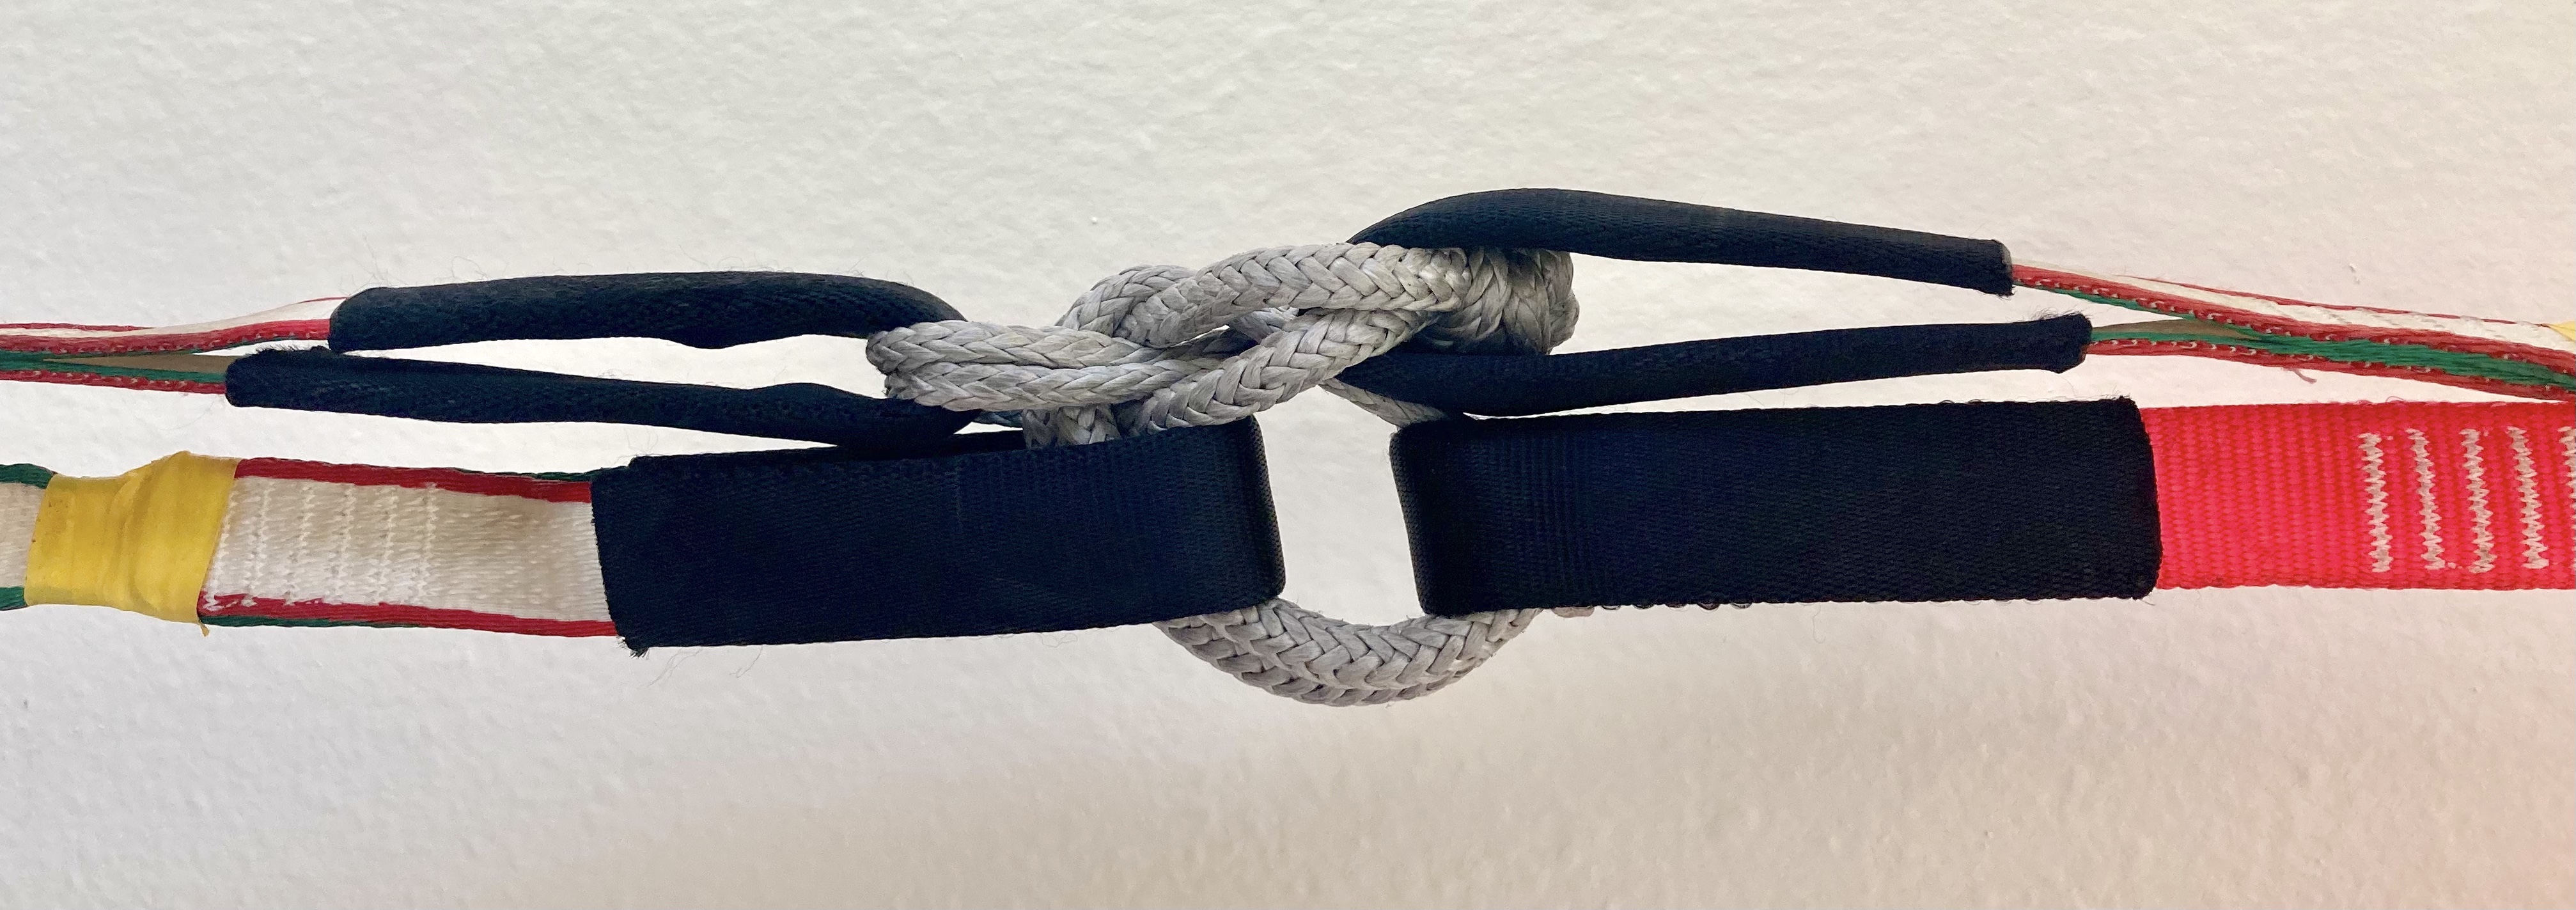
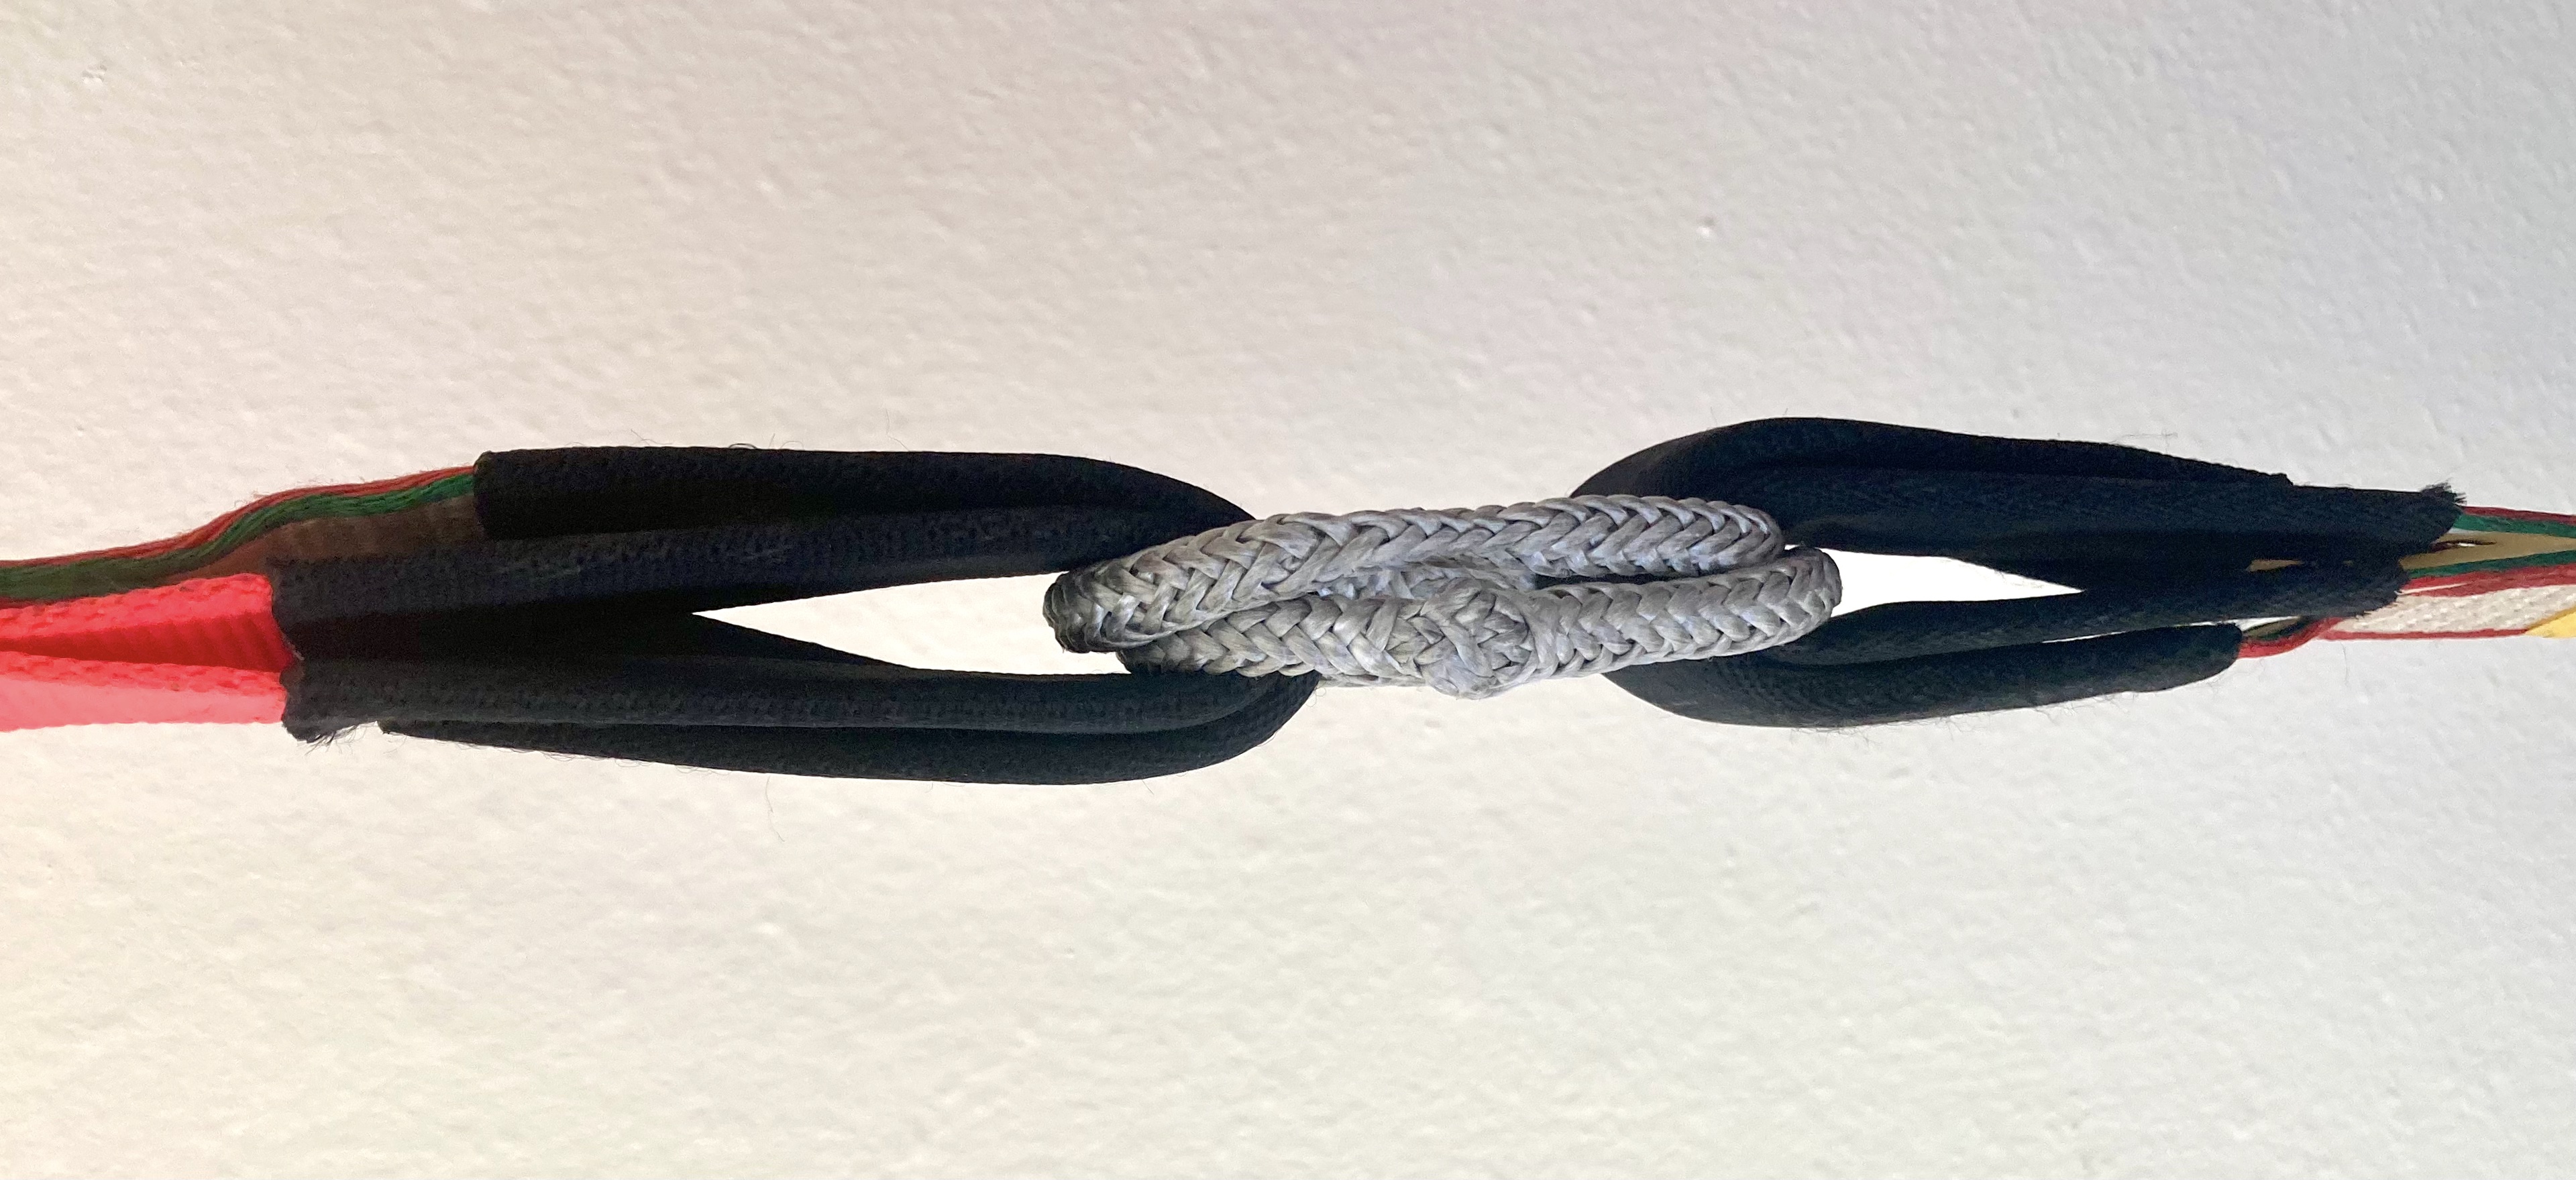
"The W" split system with two soft shackles. "The W" allows offsetting the sewn loops by using a longer backup connector. The main connector soft shackle is doubled wrapped here to keep the loops close together. This split setup is not complicated once you know it, but is relatively hard to inspect when you see it the first time.
Following the tips discussed above will help you decide on a safe highline split setup. None of them, however, are foolproof against human error, and human error is the leading cause of fatal accidents in highlining. Making your splits easy to inspect will help you and anyone you rig with catch potentially catastrophic errors. Simple splits are easier to inspect, especially for people unfamiliar with your method of making connections. It should be easy to tell that both of your backups are connected to both mains and to see that each connector is going through the proper loop. Splits covered in sleeves or excessive tape can be difficult or impossible to inspect, and have a high potential for uncaught human error. For example, if you have taped a quicklink shut, it is no longer easy to tell if it has been wrenched closed without undoing the tape (if it is still easy to tell, the tape is not doing anything).
"The W" split system with two soft shackles, opened to show its structure. The doubled soft shackle goes through both main loops, and the long backup shackle goes through all four loops. It is easy to inspect when laid out like this, although in practice it is normally taped up so this view cannot be seen. When making the W, it is best to construct it like this with both backups upside down, and then fold the backups towards the main to make the right-side up. This gives the backup shackle its "W" shape and keeps your webbing flat.
# Use and Convenience Related Factors
# Bulk
Splits can add significant bulk to the otherwise continuous 1" wide highlines we walk, which can catch your leashring while you walk, interrupting your flow and possibly your send. While a caught sewn loop while walking can be annoying, big splits also make rescues significantly more difficult and time consuming. While a Kootenay (knot passing pulley) can help mitigate this, they’re rarely found at most rigs and still can be needlessly caught by a large split. Rescues are already a very time sensitive maneuver, and a large split only reduces your chance of a successful outcome. Large splits are also difficult to pass through z-drags, and trying to force a split through a z-drag while under tension can easily lead to injury.
In the past 2 years, slackline companies have started to make large (~3" inner diameter) aluminum leashrings specifically designed to make walking past splits easier. However, even with big leashrings you can get snagged on an overly bulky split. With older style leashrings, a poorly made split can be almost impossible to pass. Keeping your splits slim in both directions perpendicular to the webbing will help your leashrings glide smoothly past while you walk. It’s also important to setup your split so there are no protruding pieces to catch a ring, which can include tucking button knots inside the sewn loops or inverting the shackle so they point inwards, taping your backup loops to the main so the stiff stitching can’t protrude, and taping the tab at the end of the stitching on both main and backup loops.
# Weight
Splits are generally significantly heavier than the webbing around them, which makes walking harder by changing the line dynamics and makes your whole rig heavier to carry. Heavy metal in a split can also seriously injure someone if they fall right at the split. Steel leashrings have been known to hit people in the face, breaking teeth and noses, and quicklinks in a split are just as capable of hurting someone in a fall.
The ideal split has the exact linear density, or weight per meter, of your main and backup webbing together. It is likely better to be too light than too heavy. Calculating this can be very difficult, as it requires knowing the exact weight of your sewn loops, and will differ across different webbings. It is useful as an ideal because it can help explain why saving a few dozen grams in your pack weight might not matter much, but saving that same weight out of your line might make a huge difference in how your line feels to walk.
# Ease of Setup/Takedown
If you are connecting and disconnecting different webbings on site, it is beneficial to have connections that are fast and easy to make and take apart. Even if you’ve connected your webbing beforehand, you may end up changing them on site if you made a mistake like swapping the main and backup on a segment. Soft shackles are the easiest connector to do and undo, because they do not need a special tool to use. Both quicklinks and grog splices need special tools to make a connection (a wrench and a fid, respectively), and quicklinks will also need a tool to undo. While grogs are still relatively quick to connect (see splicing grogs on site), they won’t be if you’re trying to makeshift a tool at the anchor. In addition to your connectors, it is important you are familiar with your split style and have practice making it. Trying to remember which connector goes where while stressed at the anchor is not ideal for a few reasons, speed only being one of them.
# Conclusion
When evaluating a method of connecting split highlines, ensure your chosen method is:
- Strong
- Redundant
- Prevents cascading failures
- Secure
- Minimizes movement
- Easily inspectable
Once all these criteria are met, convenience factors like bulk, weight, and ease of setup and takedown can differentiate between competing options.
Split connections have significant safety advantages over continuous highlines across a range of different scenarios, but also add risk of high-consequence failures. Carefully constructing and inspecting whichever split you choose is vital for having a safe rig.